Are you having trouble receiving or sending emails from your WordPress site?
Email deliverability is one of the most important parts of running a website. From password reset emails to order confirmations, having a reliable email service is a must.
In this article, we will show you how to use an SMTP server to send WordPress emails.
The Problem With WordPress Emails
WordPress uses PHP for most of its functions, including sending emails.
Many shared hosting providers do not have the email function configured properly, or they have disabled it entirely to avoid abuse. In either case, this causes your WordPress emails to not be delivered.
The alternative solution is to use a third-party email service to send out your emails. You can use services like Mailgun, Google Workspace, or SendGrid.
You will have to pay for your account, and the cost will vary depending on how many users/accounts you add or the number of emails you send. See our tutorial on how to fix the WordPress not sending email issue.
Additionally, some web hosts limit the number of emails users can send from their servers. For more information about why WordPress emails won’t send, check out our blog post on why you should never use WordPress to send newsletter emails.
There is another option, however. You can use SMTP to send emails using the WordPress hosting that you already have.
SMTP, which stands for Simple Mail Transfer Protocol, allows you to use an external mail server to handle email delivery. This ensures higher email deliverability rates and can prevent your emails from landing in the spam folder.
Video Tutorial
For written instructions, just continue reading.
Using Email Accounts by Your Host
Most WordPress hosting providers offer email services for each domain you host with them. This means you can create email accounts with your own domain name, like yourname@yoursite.com.
Using your website’s domain will help you engage your subscribers from your email list and help you stay on-brand by sending messages with your domain name rather than a personal inbox.
First, you will need to create an email account. For the sake of this example, we will show you how to create an email account in cPanel using Hostinger. Your hosting service provider may use some other account management system, but the basic process is the same on most hosting services.
Log into your hosting account and click on ‘Emails’ so that you can create a new email under your domain. Then go ahead and click ‘Manage’ next to your domain.

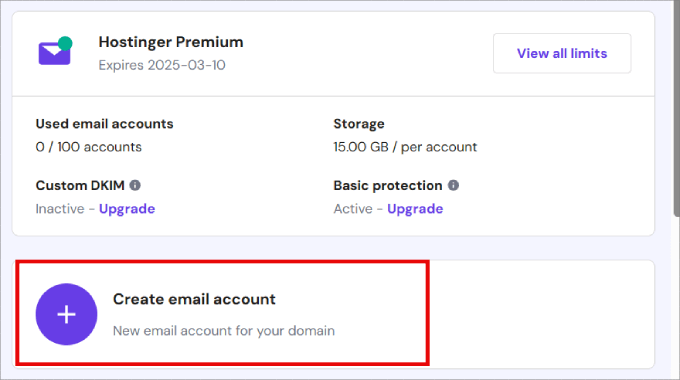
Then, you’ll need to click on ‘Create email account.’
That way, you can set up a business email under your domain name rather than the default version that WordPress gives you.
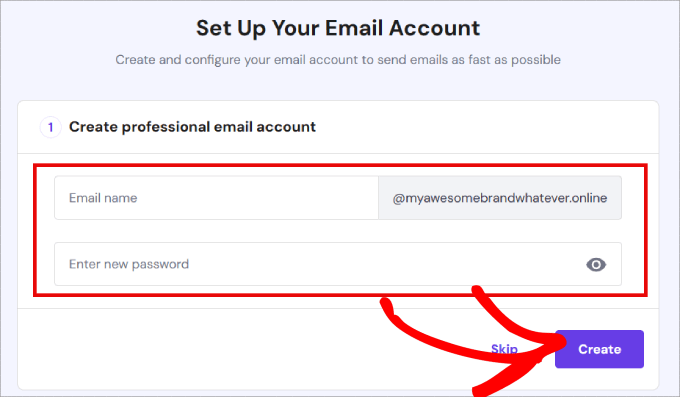
This will show you a simple form, where you need to fill out the information required to create your email account.
Since we will be using this account to send WordPress emails, we recommend that you create an email account like wordpress@example.com. Make sure to replace example.com with your own domain name.
Go ahead and enter your email name and password. Then click ‘Create.’
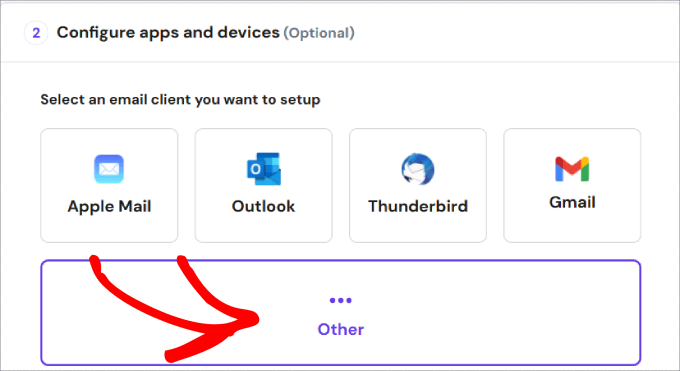
From here, you’ll be asked to configure third-party email services to connect to.
That said, you can choose ‘Other’ if you don’t want to use any of the given services.
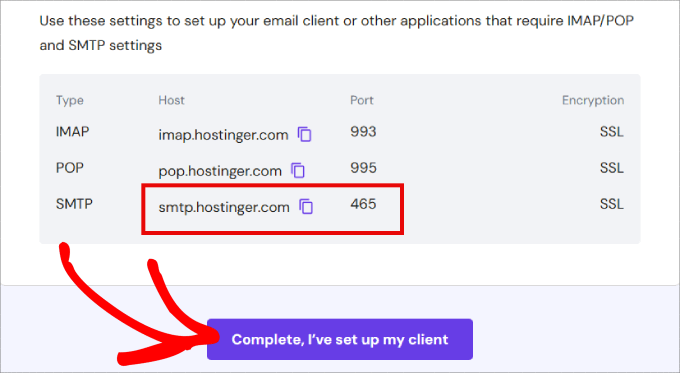
Make sure to copy the SMTP Host and Port since you’ll need to add that information to the settings of your WordPress SMTP plugin to start sending emails reliably.
The SMTP Host will allow you to send emails from the email address you’ve just created, and the SMTP Port is for secure login.
Finally, go ahead and click on ‘Complete, I’ve set up my client.’
If you’re using another hosting provider, like Bluehost or SiteGround, you can check the support section on your host’s website for this information. Most likely, there will be an article providing this information. If you don’t find it, then you should contact the hosting support to request this information.
Unfortunately, WordPress doesn’t offer built-in native SMTP settings by default. If you want to configure SMTP in WordPress for emails, you must install a SMTP plugin.
Using a WordPress SMTP plugin allows all of your emails to reach the desired destination by connecting to a server made to handle all types of emails. It will replace the default method of sending emails through WordPress, which uses the unreliable PHP mail system.
Using Your Branded Email Address in WordPress
You will now need to install and activate the WP Mail SMTP plugin.
Used by over 3 million websites, the WP Mail SMTP plugin is the best SMTP plugin for WordPress. It allows you to fix your emails easily by sending them through an email provider, which is a much more reliable way of sending emails than from your web server.
For more details, see our step-by-step guide on how to install a WordPress plugin.
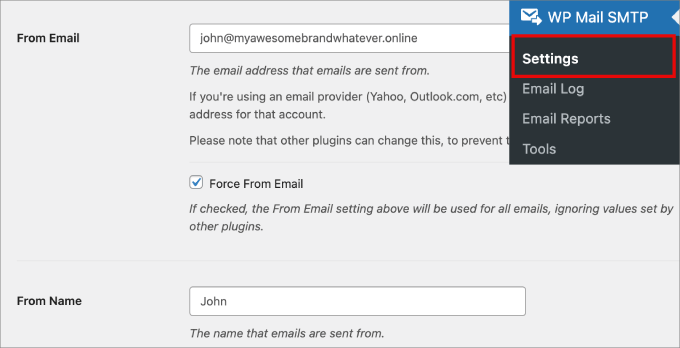
Upon activation, you must visit Settings » Email to configure the plugin settings.
First, you need to enter the email address you just created in the From Email field. After that, you can add a From Name that will be used as the sender name.
Next, you need to choose the mailer. Go ahead and check the box next to Return Path that says, ‘Set the return-path to match the From Email’. After that, you need to check the box next to ‘Return Path’ option.
This option sets the return path to match the sender’s email address. If you leave it unchecked, bounced messages and non-delivery receipts will be lost.
Then, click on the ‘Other SMTP’ option to select it. If you have another mailer service, you can select that instead.
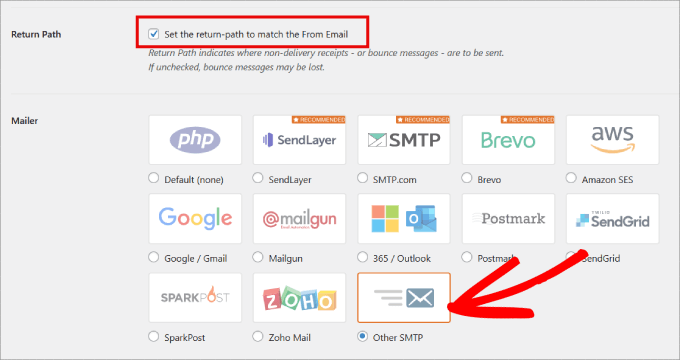
Note: The free version of WP Mail SMTP supports SendLayer, SMTP.com, Brevo, Google Workspace, Mailgun, Postmark, SendGrid, SparkPost, and Other SMTP.
However, the Pro version also supports Amazon SES, Microsoft 365/Outlook, and Zoho Mail in addition to all the free options. Also, with the Pro version, you can turn on Detailed Email Logs and Instant Email Alerts. The email logs allow you to keep records of every email sent out, and the email alerts inform you whenever your site fails to send an email.
Next, you need to set up SMTP options.
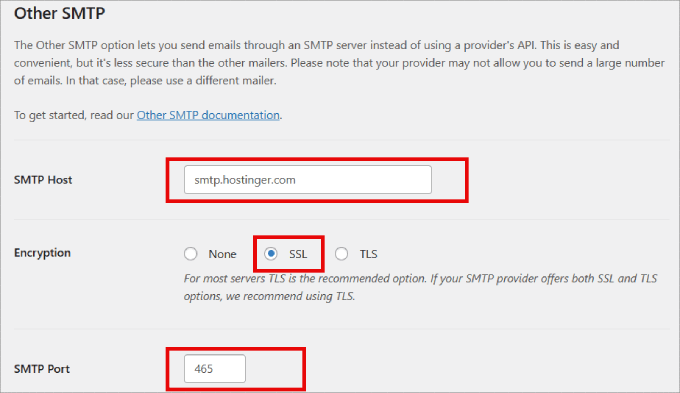
First, you need to enter your SMTP host and port that you copied earlier.
You can obtain this information from your hosting provider. Typically, the SMTP host is mail.yourdomain.com (replace yourdomain.com with your own domain name). For SMTP, Port 465 is commonly used.
Depending on your hosting provider, they’ll provide an encryption method when signing up for an email account.
In this case, we are given an SSL encryption method in Hostinger, so we will select that option. However, some hosting services may provide TLS options as well.
Choosing the encryption method is important because it ensures your emails are secure and private. Without it, the content inside the emails could be intercepted and read by unauthorized parties.
After that, turn on the authentication toggle and provide your SMTP username and password. Normally, your email address is also your SMTP username.
Then go ahead and give your SMTP account a password.
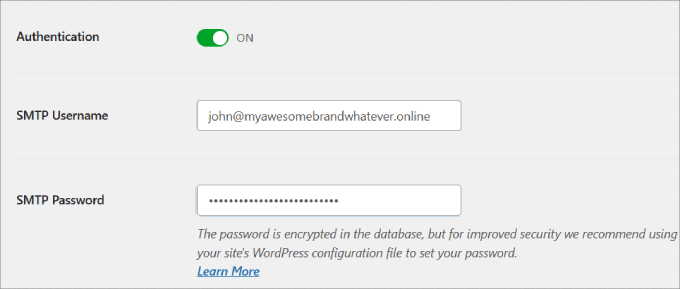
You can always use a password manager, like 1Password, to securely manage your passwords.
Don’t forget to click on the ‘Save Settings’ button to store your changes.
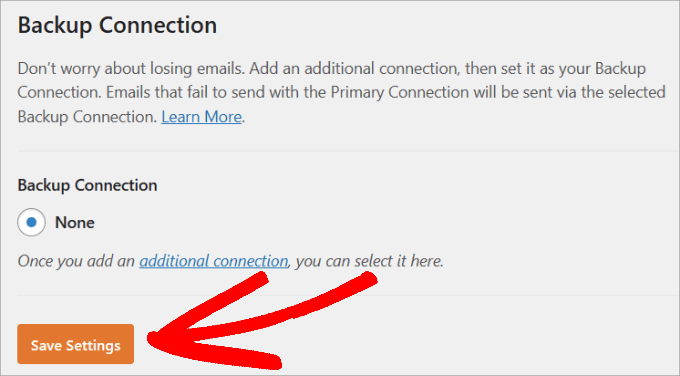
Keep in mind that if you do have another mailer service, you can add that service as a backup connection. That means if an email fails to send using your primary connection, then WP Mail SMTP will automatically try to send the email again using your backup connection.
If you’d like to add another mailer service, just hit the ‘additional connection’ link shown in the screenshot above, and WP Mail SMTP will guide you on how to do it.
If you don’t have Hostinger, these steps will look a little different. In that case, you may want to check out our ultimate guide on how to set up WP Mail SMTP with any host.
Testing Your SMTP Settings
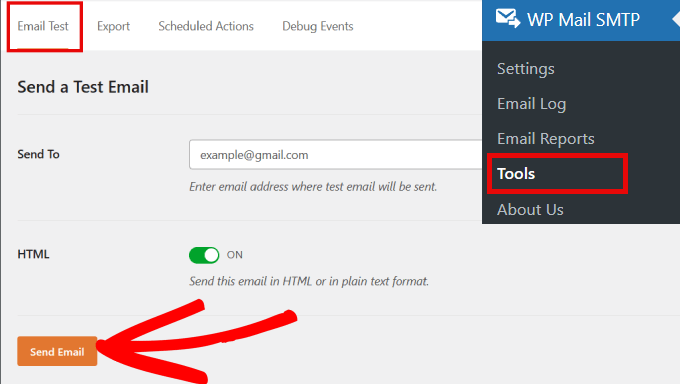
Now that you have set up WP Mail SMTP to send emails, let’s test if everything is working fine. Head over to WP Mail SMTP » Tools in the WordPress admin panel.
Under the ‘Email Test’ tab, you need to provide an email address where you would like to receive a test email. This could be any valid email address that you can access.
Go ahead and toggle the HTML button to ‘ON.’ After that, click on the Send Email button to continue.
WP Mail SMTP will now send an email message using the SMTP settings you entered earlier.
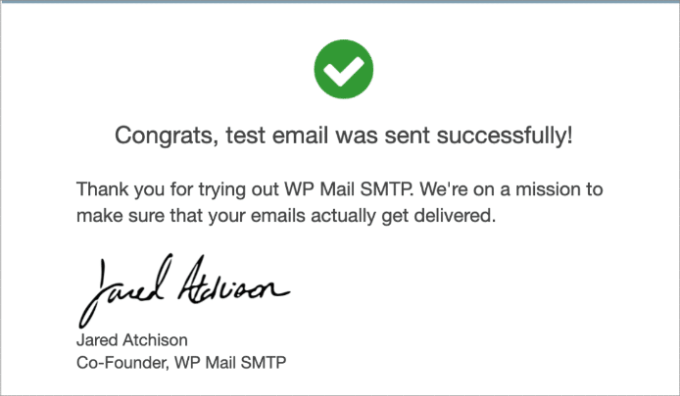
Check your inbox, and you should see a success message appear informing you that the email was sent successfully.
Troubleshooting WordPress Email Issues
The most common reason for errors in sending emails using SMTP is an incorrect SMTP host or port.
Make sure that you are entering the correct host and port settings provided by your hosting provider.

Make sure that you select the correct encryption method.
Usually, SSL works on most environments, but we recommend that you check with your web host if your emails are not getting delivered.
Resending Emails Manually
Even if there aren’t any SMTP configuration errors, you may still experience temporary issues.
For example, the recipient’s email server might be causing emails to bounce or the mailer service may place a cap on how many emails you can send per day. If you exceed the allowed number of sent emails in a given time frame, the emails may be rejected.
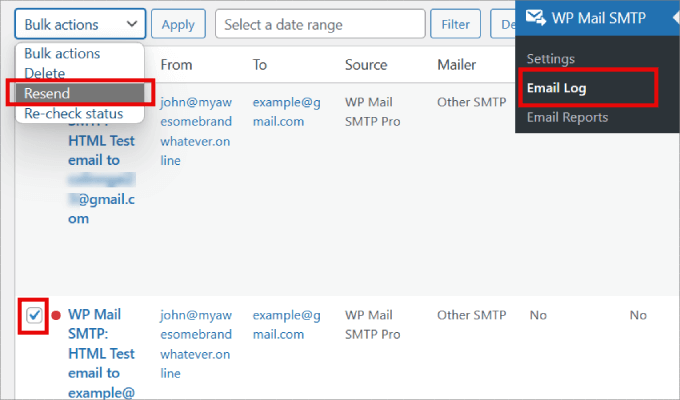
In that case, you can simply resend it to those specific recipients. All you have to do is head over to WP Mail SMTP » Email Log.
Simply check all of the boxes next to the emails that failed to resend, and under the Bulk Actions dropdown menu, select the ‘Resend’ option and click ‘Apply.’
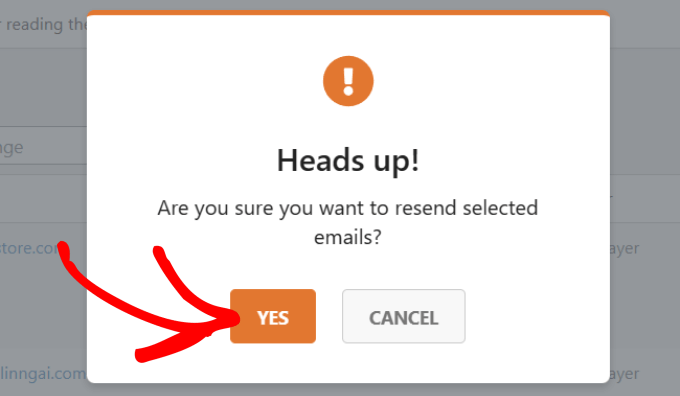
Then, a pop-up message will appear, asking you to confirm if you want to resend the selected emails.
Go ahead and hit the ‘Yes’ button.
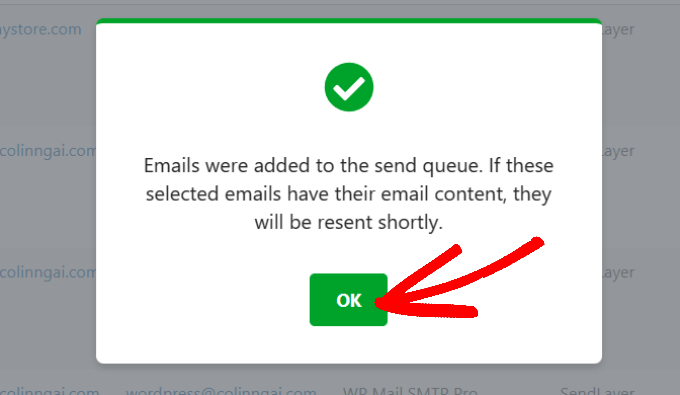
Finally, you’ll receive a confirmation message on the screen that the emails are in the queue and will be resent shortly. Then, click ‘OK.’
There you have it! Now you know how to successfully use an SMTP server to send WordPress emails.
Pros and Cons of Using Your Web Host’s Mail Servers for WordPress Emails
First and foremost, the most obvious advantage of using your web host’s servers for sending emails in WordPress is that you can use your own branded email address.
Another pro is that you have already paid for this service when signing up for your hosting account. You will not need to pay any extra money to send and receive emails.
However, some WordPress hosting providers enforce limitations on outgoing emails. This is why we don’t recommend using WordPress to send newsletter emails and suggest using SMTP for transaction emails alone.
Another common problem with shared hosting providers is that their mail servers can be quite unreliable at times. If you notice delays in email delivery, then you should consider using third-party email services like Google Workspace, Mailgun, or SendGrid.
We hope this article helped you learn how to use an SMTP server to send WordPress emails. You may also want to see our list of the must have WordPress plugins for businesses or our guide on how to create a free business email address.
If you liked this article, then please subscribe to our YouTube Channel for WordPress video tutorials. You can also find us on Twitter and Facebook.

