Do you need to add an admin user in WordPress but don’t have access to the dashboard?
At WPBeginner, we often help users who get locked out of their WordPress admin area and need to find a way back in. One easy fix is to add an admin user using FTP (File Transfer Protocol).
In this article, we will show you how to add an admin user in WordPress using FTP.
When You May Need to Add an Admin User in WordPress Using FTP
Adding a WordPress admin user using FTP instead of the WordPress admin area might be necessary in a few situations:
Lost admin access – If you can’t get into your WordPress admin dashboard because you forgot your password, a security plugin locked you out, or there’s a problem with a plugin or theme, then you can create a new admin user through FTP to regain access.
Corrupted WordPress – Sometimes, you may experience some common WordPress errors where you can’t reach the admin dashboard. Creating a new admin user via FTP can help you get control back.
Security issues – If your site gets hacked and the hacker gains admin access, then making a new admin user can help you kick them out and secure your site.
Migration problems – When moving your site to a new server, if there are issues with the admin user not working or you need to reset the info, then making a new admin user with FTP can be a quick fix.
With that in mind, we will walk you through a step-by-step guide on how to easily add an admin user to your WordPress website using FTP.
How to Add a New Admin Account in WordPress With FTP
First things first, you will need an FTP client. This software allows you to access files from your website without logging in to your WordPress dashboard. We will be using FileZilla in this tutorial, as it’s pretty easy to use.
Next, you will need to connect your website with the FTP client. To do this, you will need your FTP access details (usually accessible in cPanel or other hosting control panels).
For step-by-step guidance, you can see our guide on how to use FTP to upload files in WordPress.
Once your FTP client is connected to your website files, you will need to find your current WordPress theme’s functions.php file. You should be able to locate the file on the right side of the FTP window, inside your current theme’s folder, which is found in a path like this:
/public_html/wp-content/themes/your-current-theme/
Here’s what our screen looks like. Our demo site is using the default Twenty Twenty-Four theme.
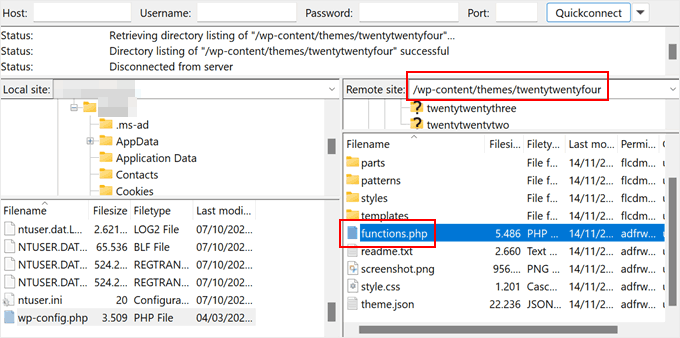
Once you have found the functions.php file, you can just double-click it. FileZilla will then download the file to your computer.
At this stage, just go ahead and locate that file on your computer. After that, open it using a plain text editor like Notepad.
Then, you need to insert this code snippet at the bottom of the file to add an admin user account:
$user=”Username”;
$pass=”Password”;
$email=”email@domain.com”;
if ( !username_exists( $user ) && !email_exists( $email ) ) {
$user_id = wp_create_user( $user, $pass, $email );
$user = new WP_User( $user_id );
$user->set_role( ‘administrator’ );
} }
add_action(‘init’,’wpb_admin_account’);
Don’t forget to replace Username, Password, and email@domain.com with your own values. You can also use the same code snippet to create other user roles if needed.
Here’s what the file should look like:
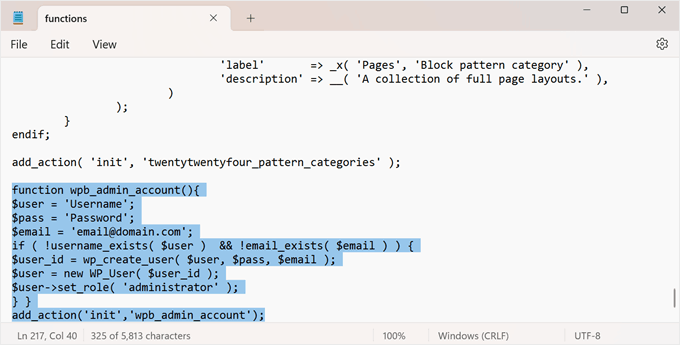
Next, simply save the file and go back to your FTP client.
Here, you need to locate the file you just edited on the left side of the interface. Right-click on it, and click ‘Upload.’
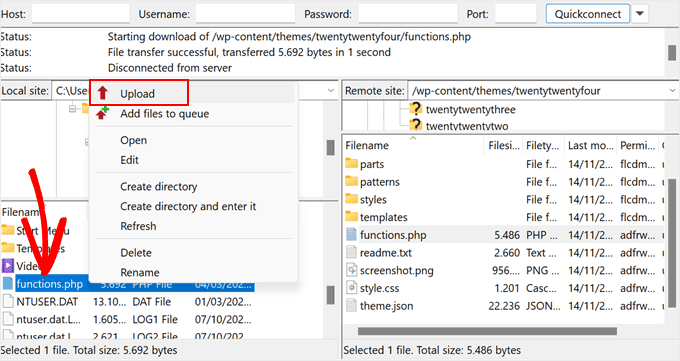
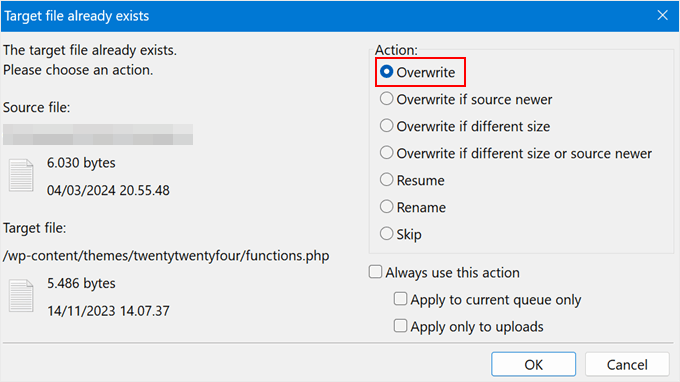
A new window will pop up saying that the file already exists in your website files.
Just select the ‘Overwrite’ option and click ‘OK.’
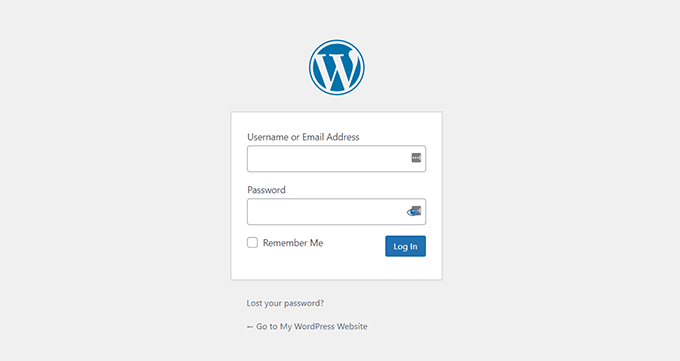
Now, open yourwebsitename.com/wp-admin in your browser. Remember to replace yourwebsitename.com with your own domain name.
If the code works, then you will be able to type your credentials into the login page and access the WordPress admin area again.
Note: Once you have logged in to your WordPress site, you should go back to your FTP client to open the functions.php file again and delete the code you added.
Deleting the code will not remove the user. This is just to ensure that the code does not execute again, which could lead to unintended consequences. Plus, you can always add new users and authors to your WordPress site if needed.
Alternative: Add a New Admin User With Your Web Host’s File Manager
If your FTP connection was not successful and you are still locked out of the WordPress admin, then you can use your WordPress hosting’s file manager to add the code to functions.php. Beginners may also find this method much easier.
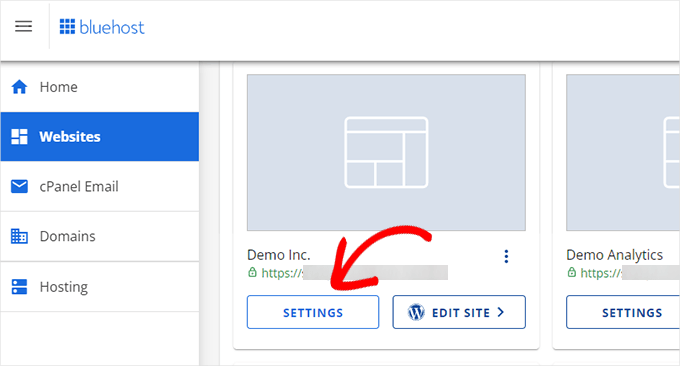
For the sake of this tutorial, we will use Bluehost’s file manager. In your hosting dashboard, just go to the ‘Websites’ tab, find the WordPress website you are locked out of, and click ‘Settings.’
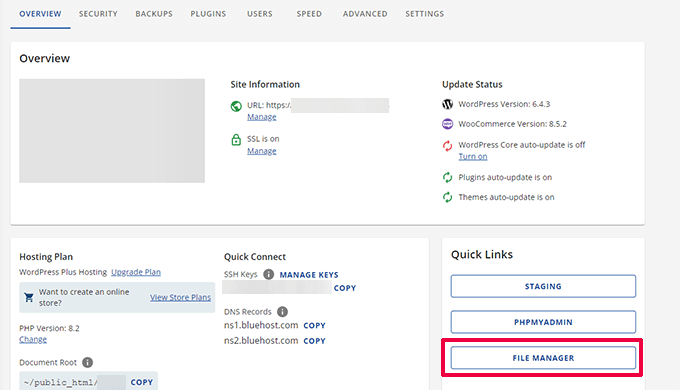
Once inside, scroll down to the Quick Links section.
Then, click ‘File Manager.’
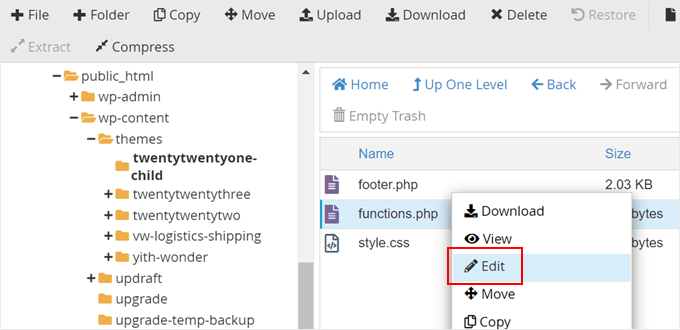
The same as the previous method, you need to find your current WordPress or WooCommerce theme’s functions.php file.
After you locate it, just right-click on the file and select ‘Edit.’
Next, simply paste the same code snippet from the earlier method.
Click ‘Save Changes.’
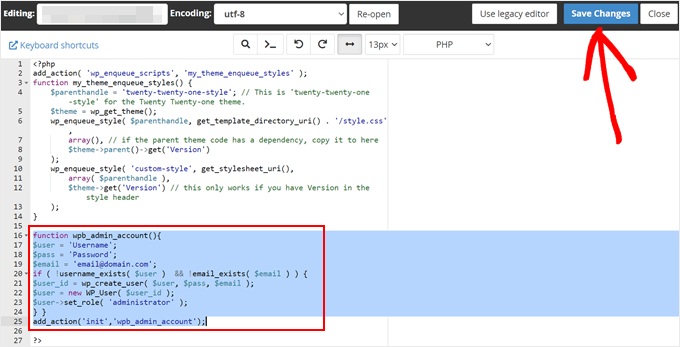
All you need to do next is go to your WordPress login URL and try signing in with your new admin user’s login details.
Bonus: Learn More WordPress functions.php Hacks
Besides adding a new admin user, there are actually a lot of cool tricks you can do with the functions.php file.
For example, you could add new widget areas that are not default in your WordPress theme. This way, you have more space to insert your widgets.
You can also disable automatic update email notifications, which can get annoying if you have a lot of plugins and themes that auto-update.
You can learn more about all of these hacks in our ultimate list of useful tricks for the WordPress functions.php file.
And if you want to try out all of these tips and tricks, then we recommend using WPCode. While it’s possible to edit functions.php with an FTP client, WPCode makes it safe and easy to manage all of the different code snippets that you add to the file.
This way, you can keep track of every custom code snippet that’s been added and disable it in a few clicks if an error occurs.
You can read more in our full WPCode review.

We hope this WordPress tutorial helped you learn how to add an admin user to WordPress using FTP. You may also want to see our article on how to add a WordPress admin user to the MySQL database with phpMyAdmin and our ultimate WordPress SEO guide to boost your rankings.
If you liked this article, then please subscribe to our YouTube Channel for WordPress video tutorials. You can also find us on Twitter and Facebook.

