WordPress is typically used to create blog posts and pages for your website. However, some users may need to add a separate static HTML page and make it accessible along with their general WordPress site.
The problem is that this page is not recognized by WordPress, and it may show a 404 error.
In this article, we will show you how to properly upload an HTML page to WordPress without causing a 404 error.
Why Upload HTML Pages to WordPress?
WordPress comes with a built-in content type to add pages to your website. Often, WordPress themes add pre-designed page templates to display your pages.
There are even WordPress landing page plugins that allow you to create beautiful page templates with a drag-and-drop builder.
This means that, in most cases, you shouldn’t need to upload an HTML page to your WordPress site.
Expert Tip: We recommend using SeedProd, the best WordPress page builder plugin, to design custom pages. You can use its drag-and-drop interface to design your landing page. Plus, it comes with professionally designed templates to use as starting points.

However, sometimes, you may have static HTML pages from your old website or a static template that you like and want to use.
In these scenarios, you will need to upload your HTML page to WordPress.
Since WordPress comes with its own SEO-friendly URL structure, it may cause a 404 error if you simply upload your HTML page and try to access it.
That being said, let’s look at how to upload an HTML page to your WordPress site without causing 404 errors.
Uploading HTML Page to WordPress Site
First, you need to prepare the HTML page that you want to upload.
If it is a single HTML page with no separate CSS or image files, then you can go ahead and upload it as is.
However, if the page you want to upload has separate CSS files and images, then you need to place them in a directory structure.
Ideally, you would want to place your files in a folder on your computer.
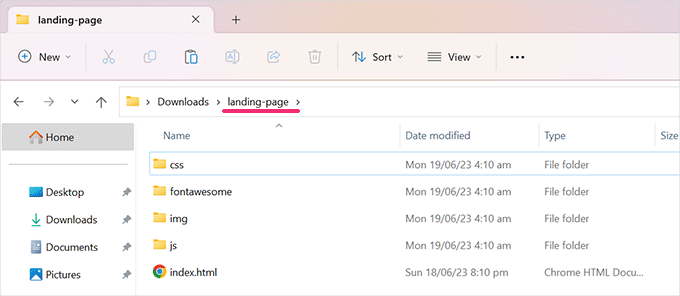
Don’t forget to open your main HTML file to make sure that everything works as expected.
Next, you need to connect to your WordPress site using an FTP client or the File Manager app in your hosting account control panel.
After that, you need to upload the folder you created earlier to the root folder of your WordPress website. The root folder is the one that has the wp-admin, wp-content, and wp-includes folders inside it.
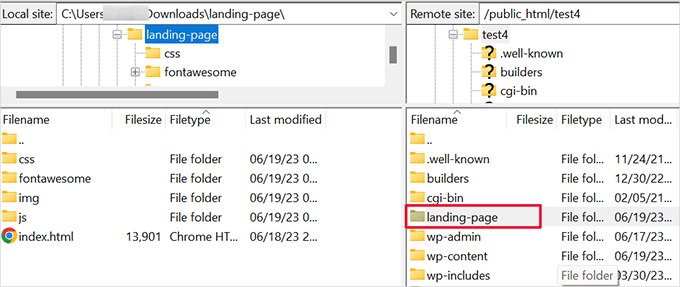
After uploading your files, you can go to your website to view your HTML page.
If you uploaded the folder with HTML and accompanying CSS and image files, then you will need to add the name of the folder you uploaded to the end of your website address, like this:
https://example.com/landing-page/
Note: The main HTML file in your folder should be called index.html. Otherwise, you will have to provide the name of the HTML file, too.
On the other hand, if you uploaded a standalone HTML file, then simply add the HTML filename to the end of your website address:
https://example.com/landing-page.html
You will now see your uploaded HTML page.
If you run into an error page, then you will need to troubleshoot the error.
Troubleshooting HTML Page Upload in WordPress
Normally, you should be able to view your HTML page by visiting the page or folder directly.
However, due to the rewrite rules used by WordPress or your web server, there is a chance that you may run into some common WordPress errors.
1. Fixing 404 Error After HTML Page Upload in WordPress
The 404 error is one of the most common WordPress errors. However, it is quite easy to fix in most cases.
If you are seeing a 404 error after uploading your HTML page, then you just need to add a rewrite rule to your .htaccess file:
2. Fixing 403 Error After Uploading an HTML Page in WordPress
A 403 error may also occur due to file permissions on your newly uploaded HTML page or the folder that you uploaded.
Simply connect to your website using an FTP client and click to select the HTML page or the folder you uploaded.
Next, right-click and then select the ‘File permissions’ option in your FTP client.
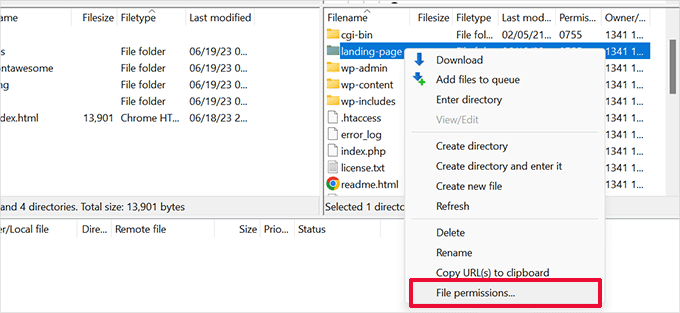
This will bring up a file permission popup. Enter ‘755’ into the numeric value field and check the ‘Recurse into subdirectories’ option.
Below that, select the ‘Apply to all files and directory’ option and click on the ‘OK’ button.
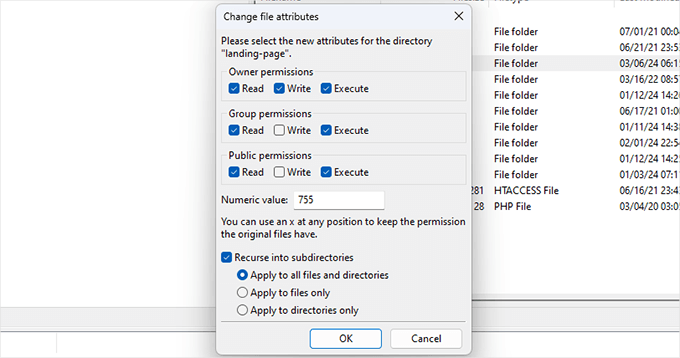
This will set the file permissions for your HTML upload folder and all the files and folders inside it.
For more details, see our tutorial on how to fix file and folder permissions error in WordPress.
Adding Your Custom HTML Page to XML Sitemaps
Now that you have uploaded your HTML page, it is time to let search engines know that it is part of your website.
The easiest way to do that is by adding it to the XML sitemaps for your website.
If you haven’t set up sitemaps yet, then follow the instructions in our article on how to add XML sitemaps in WordPress.
First, you’ll need to install and activate the All in One SEO for WordPress plugin. For more details, see our article on how to install a WordPress plugin.
Upon activation, go to the All in One SEO » Sitemaps page. Under the General Settings page, make sure that the ‘Enable Sitemap’ toggle is turned on.
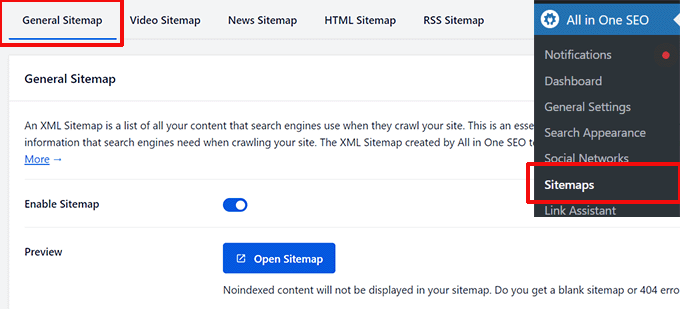
After that, scroll down a little to the Additional Pages section.
Slide the toggle to activate this section and then enter your HTML page or folder URL under the ‘Page URL’ option.
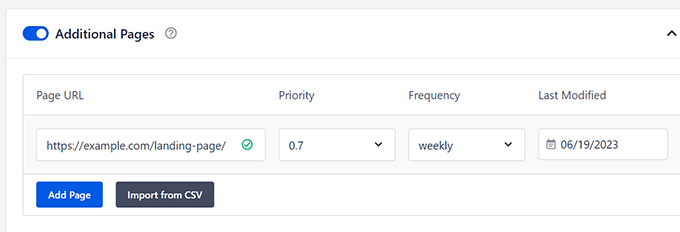
Click on the ‘Add Page’ button to add it.
After that, don’t forget to click on the ‘Save Changes’ button to store your settings.
All in One SEO will now include your custom HTML page URL in your WordPress XML sitemaps. Search engines will be able to find the URL and treat it as any other page from your website.
We hope this article helped you learn how to upload an HTML page to WordPress without causing errors. You may also want to see our WordPress SEO guide to get more traffic or take a look at our beginner’s guide to WordPress speed and performance.
If you liked this article, then please subscribe to our YouTube Channel for WordPress video tutorials. You can also find us on Twitter and Facebook.

