If you have a look at the Gutenberg “Button” block and click on the styles tab (half moon cookie) you will see that you can select from Fill or Outline for it’s style. What if you wanted to add more options? Or you wanted to add style options to other blocks?
In this guide, I will show you how to register your own custom block styles.
What are Block Styles?
If you’ve come to this guide you probably already know what Block styles are. But just incase I will quickly explain. Actually it’s easier if I let WordPress explain for me. Below is an excerpt from the official Gutenberg documentation:
Block Styles allow alternative styles to be applied to existing blocks. They work by adding a className to the block’s wrapper. This className can be used to provide an alternative styling for the block if the block style is selected
WordPress.org
So, block styles are options that you can click on when editing a block. When doing so, it will inject a classname to the block. This classname can then be referenced via CSS.
Why Register Custom Block Styles?
Registering custom styles will allow you to have different designs for your blocks that you can use in different contexts. For example, if your website is white and you insert a white picture in a post it may not look great. You could register a “Bordered” style for the Image block that adds a gray border around the image that will make it pop.
Sure, you could just use the setting at Block > Advanced > Additional CSS class(es) to add custom classnames for your blocks. However, this requires remembering class names. And if you are working on a client site they will appreciate an easy way to apply custom designs to their blocks.
An added benefit is that when you register custom block styles you can set the inline CSS for the style, this way the CSS is automatically added in the editor and the frontend whenever the style is selected.
How to Register a New Block Style
For the purpose of this guide, I’m going to focus specifically on server-side registering of custom styles. In other words, using PHP instead of Javascript. For most users, this will be easier and faster. You can quickly dump code into a code snippet plugin to add custom block styles to the site.
So, to register a new block style with PHP you will use the appropriately named register_block_style function. This function takes to arguments: $block and $style_properties. So you would tell it what block you want to add your styles to and then an array of the style properties.
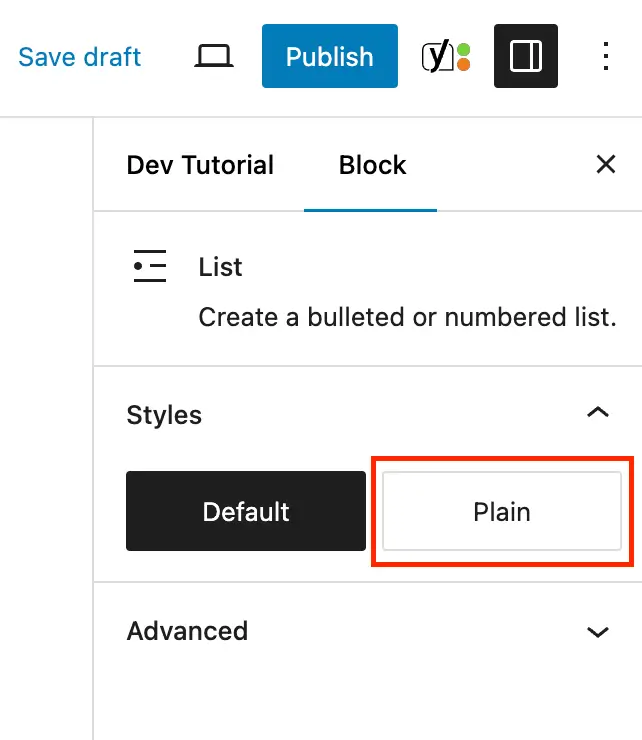
Here is an example of adding a new “Plain” style to the List block:
/**
* Register custom block styles.
*
* @link https://www.wpexplorer.com/how-to-add-custom-block-styles-wordpress/
*/
function wpexplorer_register_block_styles() {
register_block_style(
‘core/list’,
[
‘name’ => ‘list-plain’,
‘label’ => ‘Plain’,
]
);
}
add_action( ‘init’, ‘wpexplorer_register_block_styles’ );
With this coded added to your site when you insert a new list block you should see a new option to select a “Plain” style like such:
Notice how in my example I am using ‘core/list’ as the block name I want to add my custom style option to and not just ‘list’. All the WordPress default block names are prefixed in such a way. If you aren’t sure what the correct name is for a block, have a look at the list of all WordPress core blocks.
Also, in my example I have used 2 properties (the required ones) for my custom style: name and label. The label is will be used as the text in the Gutenberg UI and the name will be used for the classname added to the block in the format is-style-{name}.
I will explain later on how you can apply custom CSS to your block styles. So keep on reading.
How to Register Multiple Block Styles
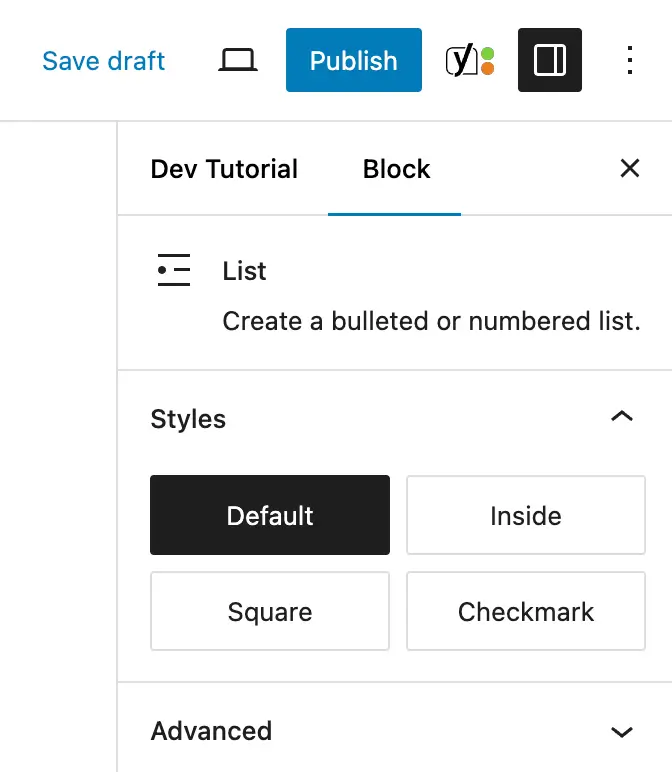
For each style you want to add you will need to use the register_block_style function. So for example if you want to add more styles to the List block you could do so like such:
/**
* Register custom block styles.
*/
function wpexplorer_register_block_styles() {
// Inside List
register_block_style(
‘core/list’,
[
‘name’ => ‘list-inside’,
‘label’ => ‘Inside’,
]
);
// Square List
register_block_style(
‘core/list’,
[
‘name’ => ‘list-square’,
‘label’ => ‘Square’,
]
);
// Checkmark list.
register_block_style(
‘core/list’,
[
‘name’ => ‘list-checkmark’,
‘label’ => ‘Checkmark’,
]
);
}
add_action( ‘init’, ‘wpexplorer_register_block_styles’ );
With this code added you would now see 3 extra styles added to the list block like such:
Writing Slimmer Code (DRY Code)
If you are registering a ton of styles on your site I would recommend creating an array of the styles you will register so you can loop through them. This way you aren’t having to add the register_block_style over and over. This will keep your code slim and DRY.
Here is an example using an array to register multiple block styles:
/**
* Register custom block styles.
*/
function wpexplorer_register_block_styles() {
$styles = [
// List Styles
‘core/list’ => [
[
‘name’ => ‘list-inside’,
‘label’ => ‘Inside’,
],
[
‘name’ => ‘list-checkmark’,
‘label’ => ‘Checkmark’,
]
],
// Button Styles
‘core/button’ => [
[
‘name’ => ‘button-three-d’,
‘label’ => ‘Three-D’,
]
],
];
foreach ( $styles as $block => $style_props ) {
register_block_style( $block, $style_props );
}
}
add_action( ‘init’, ‘wpexplorer_register_block_styles’ );
See how much nicer this is? I would encourage you to always think about writing code in a DRY way without repeating yourself.
Styling Your Block Styles with CSS
I’ve showed you how to register custom block styles that you can select in the Gutenberg editor. But, this won’t actually cause your block to look any different. For that, you will need to add CSS to your site to target your custom styles.
I mentioned previously when you select a block style WordPress will insert the classname format is-style-{name} into the block’s class attribute. So you can use this to target the element.
Let’s say you wanted to add a checkmark list style type to your site so you would register your style like such:
function wpexplorer_register_checkmark_list_style() {
register_block_style(
‘core/list’,
[
‘name’ => ‘list-checkmark’,
‘label’ => ‘Checkmark’,
]
);
}
add_action( ‘init’, ‘wpexplorer_register_checkmark_list_style’ );
Then you can add the following CSS to your site to apply a custom checkmark design for your list:
@counter-style checkmark {
system: cyclic;
symbols: “2713”;
suffix: ” “;
}
.wp-block-list.is-style-list-checkmark {
list-style: checkmark;
}
If you added your CSS to your theme’s style.css file, the WP custom CSS customizer field or via a plugin then your list should be styled correctly on the frontend.
But, we are working with Gutenberg, so you should add your CSS when you register your block to ensure the styling is applied in the backend as well.
To register your CSS along with your style you can do so via 2 methods:
Custom Stylesheet: You can pass the “style_handle” property to your register_block_style function with the name of a registered stylesheet. WordPress will automatically load the CSS file when the block is added to the post content.
Inline CSS: You can pass the “inline_style” property with the CSS you want applied to your custom block style.
Here is an example showing both methods:
function wpexplorer_register_block_styles_with_css() {
// Style that loads stylesheet.
register_block_style(
‘core/list’,
[
‘name’ => ‘list-example-one’,
‘label’ => ‘Example One’,
‘style_handle’ => ‘list-example-one-style-handle’
]
);
// Style that adds inline CSS.
register_block_style(
‘core/list’,
[
‘name’ => ‘list-example-two’,
‘label’ => ‘Example Two’,
‘inline_style’ => ‘.wp-block-list.is-style-list-example-two { list-style: square; }’,
]
);
}
add_action( ‘init’, ‘wpexplorer_register_block_styles_with_css’ );
For most cases, I would recommend using the inline_style property. This will keep your site faster as it won’t need to load a 3rd party dependency. In most cases you should only have a few lines of CSS anyway.
With this knowledge we can go back to the checklist example and add the CSS inline as such:
function wpexplorer_register_checkmark_list_style() {
register_block_style(
‘core/list’,
[
‘name’ => ‘list-checkmark’,
‘label’ => ‘Checkmark’,
‘inline_style’ => ‘@counter-style checkmark {system: cyclic;symbols: “2713”;suffix: ” “;}.wp-block-list.is-style-list-checkmark {list-style: checkmark;}’
]
);
}
add_action( ‘init’, ‘wpexplorer_register_checkmark_list_style’ );
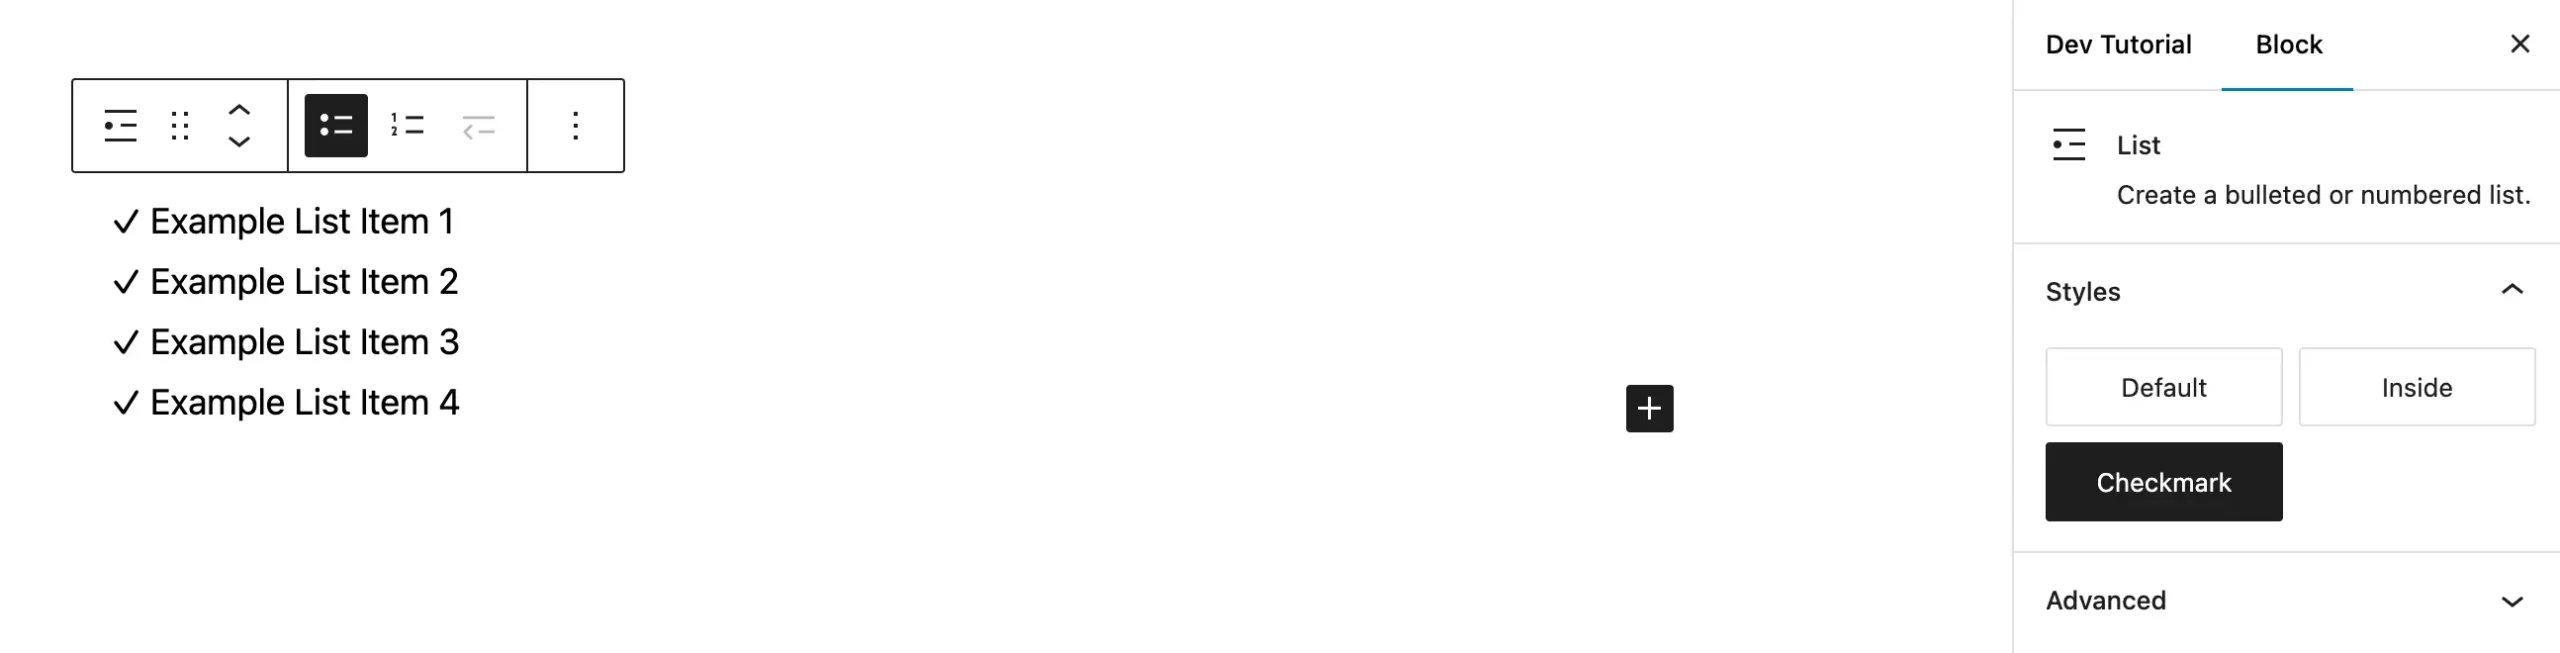
Now if you were to try this checkmark list style out it should render beautifully in both the Gutenberg editor and on the live site. Here is a screenshot taken in the backend.
How to Set a Custom Style as the Default Style
This isn’t something I would necessarily recommend but if you wanted you could also set one of your custom styles as the default. To make your style the default, simply pass the is_default property to your array like such:
register_block_style(
‘core/list’,
[
‘name’ => ‘list-new-default’,
‘label’ => ‘New Default’,
‘is_default’ => true, // ADD THIS.
]
);
Now anytime you insert the targeted block (in this case List) your custom style will be used as the default style.
Important: When a custom style is set as the default it means that NO classname will be added to the block when it’s selected.
Bonus: How to Remove a Registered Block Style
Ok, you are now a pro at adding custom block styles. But what if you wanted to remove an existing style from a block? Luckily, WordPress has a helper function we can use for this as well.
To remove an existing block style use the unregister_block_style function. Here is an example showing how to remove the ‘list-checkmark’ style from the ‘core/list’ block:
function wpexplorer_unregister_checkmark_list_style() {
unregister_block_style( ‘core/list’, ‘list-checkmark’ );
}
add_action( ‘init’, ‘wpexplorer_unregister_checkmark_list_style’ );
The unregister_block_style is useful primarily for removing styles from a block theme that’s registering custom ones server-side.
Important: Using the unregister_block_style function will ONLY remove blocks that were registered server-side via the register_block_style function. To remove styles added client-side you will need to use the Javascript Block API – keep reading to learn how!
Since you can’t remove core WordPress block styles using PHP I wanted to provide to show you how you can do so using JS. The following example will remove the “outline” style from the Button block:
/**
* Remove the outline block style.
*/
function wpexplorer_remove_outline_block_style() {
// Register a “dummy” script so we can add our JS inline.
wp_register_script(
‘wpexplorer-unregister-block-styles’,
false,
[ ‘wp-blocks’, ‘wp-dom-ready’, ‘wp-edit-post’ ],
);
// JS that removes the outline style from the button element.
$script = “wp.domReady( () => {
wp.blocks.unregisterBlockStyle( ‘core/button’, [ ‘outline’ ] );
} );”;
// Load our JS.
wp_enqueue_script( ‘wpexplorer-unregister-block-styles’ );
wp_add_inline_script( ‘wpexplorer-unregister-block-styles’, $script );
}
add_action( ‘admin_init’, ‘wpexplorer_remove_outline_block_style’ );
Conclusion
Adding custom Gutenberg block styles is super easy and also very useful. Here at WPExplorer I register various block styles to elements such as lists, images and buttons. This allows me to display the elements differently based on the context.
Let me know if you’ve had any issues following my guide or if you have any feedback or questions. Simply drop me a comment below.
Further Reading
And now that I’ve got your attention you may be interested in the following related articles: