Are you looking for an easy way to make a banner for your WordPress website?
A banner can highlight the products, services, or news updates offered by your website. It can increase user engagement, boost your click-through rate, and encourage visitors to take action.
In this article, we will show you how to easily make a banner for your WordPress website.
What Is a Website Banner?
A banner is a graphical display that stretches over the top, bottom, or side of a WordPress website. It often includes a brand name and logo, along with other visual elements, to promote a specific product, service, or event.
For example, if an online store has just announced a sale, then it can show a banner at the top of its pages to tell new visitors about the promotion and encourage them to make a purchase.
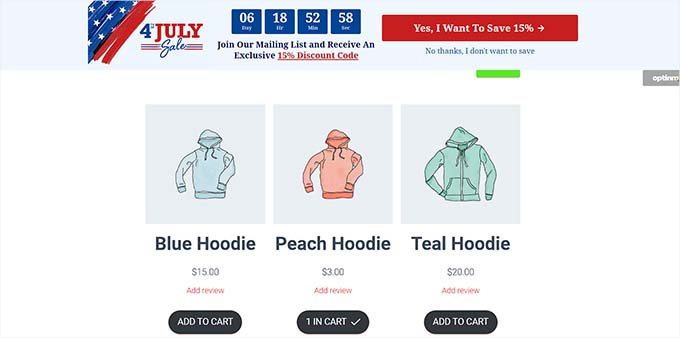
A well-designed banner can make a strong impression and invite visitors to explore the rest of your site. Plus, banners can also be used to promote affiliate products, increase brand awareness, build an email list by encouraging visitors to sign up for your newsletter, and drive traffic to other pages on your site.
You can also use banners to promote your social media accounts and encourage visitors to follow or like your pages.
What Is the Best Website Banner Size?
The ideal website banner size depends on the layout and specific marketing goals of your WordPress blog.
For example, if you want to display a rectangular and thin banner at the top of the screen, then you can use the Large Leaderboard size, which is 970 x 90.
Some of the other popular and most-used banner sizes include:
Medium Banner: 300 x 250
Leaderboard: 728 x 90
Wide Skyscraper: 160 x 600
Half-Page: 300 x 600
Large Leaderboard: 970 x 90
Billboard: 970 x 250
Large Rectangle: 326 x 280
Vertical Banner: 120 x 240
Full Banner: 468 x 60
Half Banner: 234 x 60
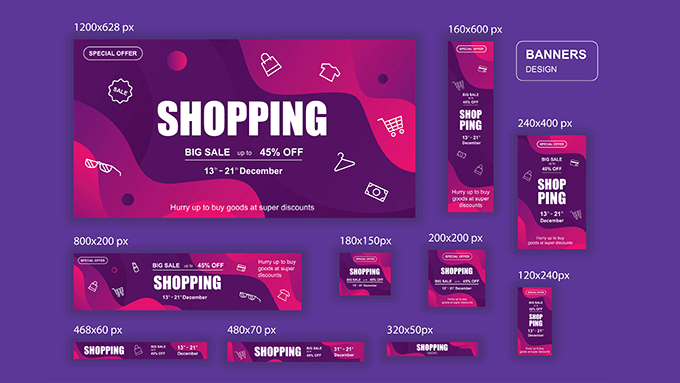
If you want to show a banner for an event in the sidebar, then you can use the Wide Skyscraper or Half-Page banner sizes. Similarly, you can also use the Medium banner size to display a square-shaped banner on your page.
If you are looking to display ad banners, then you may want to see our beginner’s guide on the highest-performing Google AdSense banner sizes and formats for WordPress.
Having said that, let’s see how you can easily make a banner on your WordPress website. For this tutorial, we will cover three methods to make a banner, and you can use the links below to jump to the method of your choice:
Method 1: Make a Website Banner Using OptinMonster (Recommended)
OptinMonster is the best WordPress banner plugin on the market that allows you to easily create floating bar and popup banners for your website.
It is the best conversion optimization and lead generation tool that helps you turn website visitors into subscribers and customers.
Plus, many of OptinMonster’s banner templates have optin fields that allow you to collect the names, email addresses, and phone numbers of your website visitors.
Step 1: Install OptinMonster on Your Website
First, you will need to sign up for an OptinMonster account. To do this, simply visit the OptinMonster website and click on the ‘Get OptinMonster Now’ button to set up an account.
After that, you have to install and activate the free OptinMonster plugin on your WordPress website. For detailed instructions, you may want to see our beginner’s guide on how to install a WordPress plugin.
Upon activation, the OptinMonster setup wizard will open in your WordPress admin panel.
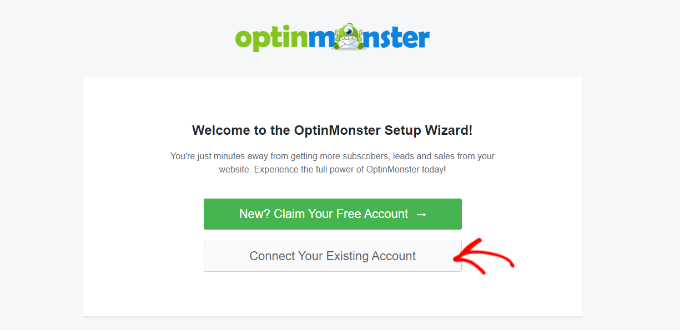
From here, you must click the ‘Connect Your Existing Account’ button to connect your WordPress site to your OptinMonster account.
This will open up a new window on your computer screen.
From here, you have to click the ‘Connect to WordPress’ button to move ahead.

Step 2: Create and Customize Your Banner
Now that you have connected your WordPress account with OptinMonster, head over to the OptinMonster » Campaigns page from the WordPress admin sidebar.
From here, you need to click on the ‘Create Your First Campaign’ button to start creating your website banner design.

This will direct you to the ‘Templates’ page, where you can start by choosing a campaign type.
For example, if you want to show your banner as a bar at the top of the screen, then you can pick the ‘Floating bar’ campaign. Similarly, you can select the ‘Popup’ campaign type to display your banner as a popup.
After that, you will also need to select a template for the campaign you chose.
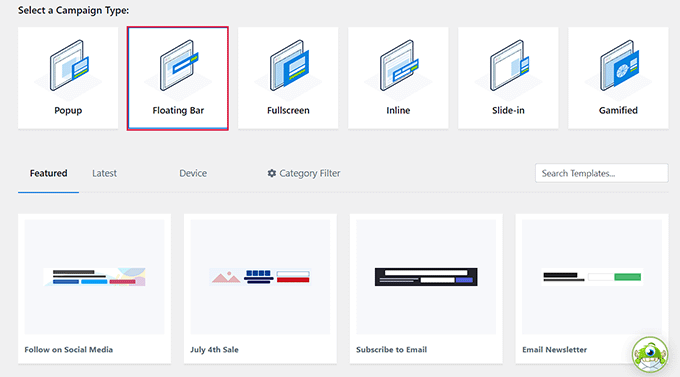
For this tutorial, we will be choosing a template for the ‘Floating bar’ campaign type.
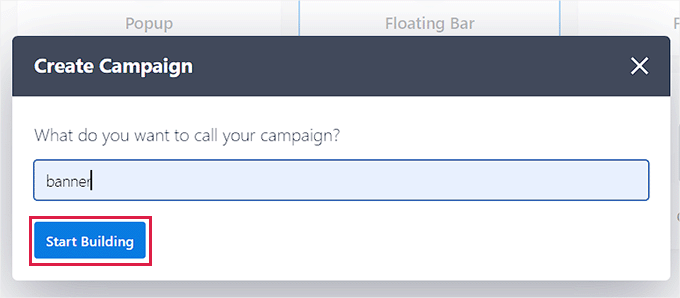
Next, you will be asked to give a name for the campaign that you are creating.
Simply type a name of your choice and click the ‘Start Building’ button to move forward.
This will launch the OptinMonster drag-and-drop interface on your screen, where you can start customizing your banner. From here, you can drag and drop fields of your choice from the sidebar on the left onto the banner.
For example, if you want to add social media icons to your banner to increase your followers, then you can drag and drop the Social Media block from the left sidebar.
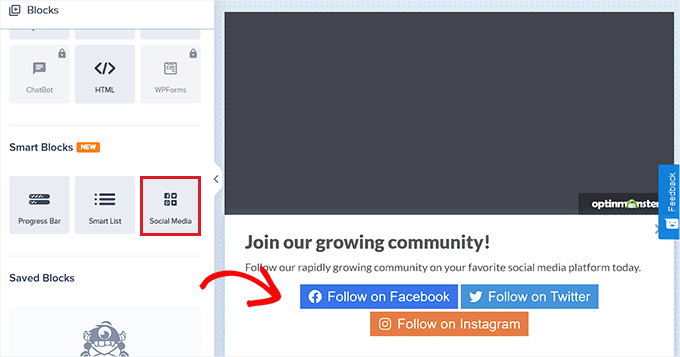
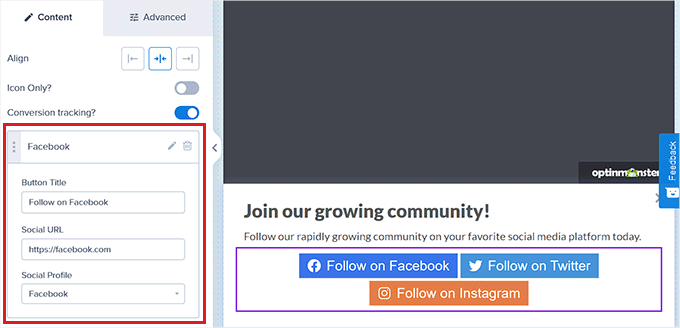
After that, just click on the block to open its settings in the left column.
From here, you can change the button title, add your social media URL, and even change your social media platform from the dropdown menu.
You can also add other blocks to display videos, images, text, or CTAs in your website banner design.
After that, you need to select the position of your banner.
By default, the OptinMonster floating bar is displayed at the bottom of your website screen once you start scrolling.
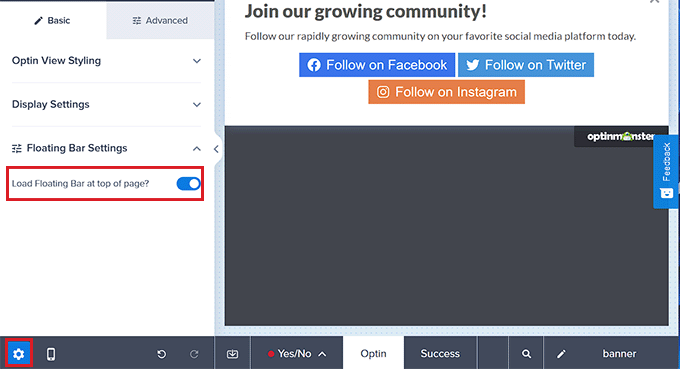
However, you can easily change this setting by clicking on the ‘Settings’ icon at the bottom of the sidebar on the left.
This will open up settings in the left column, where you must expand the ‘Floating Bar Settings’ tab. From here, simply toggle the ‘Load Floating Bar at the top of the page?’ switch to display the banner at the top.
Step 3: Add Triggers for Your Banner
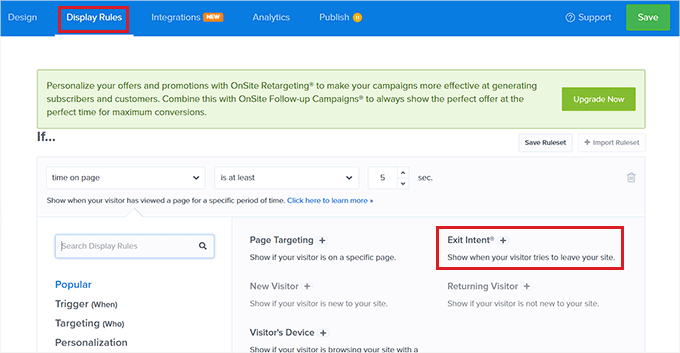
Once you have designed your banner, switch to the ‘Display Rules’ tab at the top. From here, you can add rules for your banner display.
Remember that you only need to switch to this tab if you want to add a specific display trigger for your banner. Otherwise, you can skip to the next step.
For example, if you would like to show your banner when the user is about to leave your site, then you need to choose the ‘Exit Intent’ option.
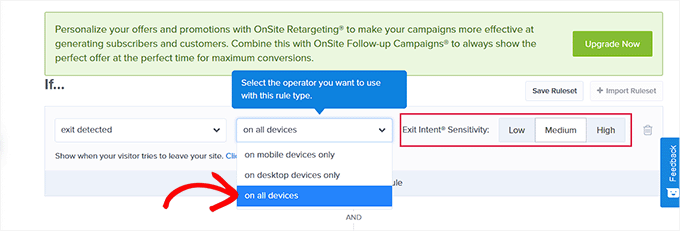
Once you have done that, just select the ‘On all devices’ option from the dropdown menu in the middle. If you wish to use this display rule for mobile devices only, then you can also choose that option.
After that, pick the Exit Intent Sensitivity according to your liking and click the ‘Next Step’ button.
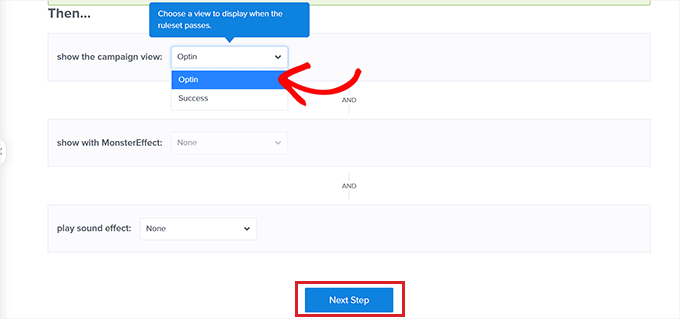
This will take you to a new screen. Here, you need to make sure that the ‘Optin’ option is selected for the ‘Show the campaign view’ dropdown menu.
Once you have done that, simply click the ‘Next Step’ button.
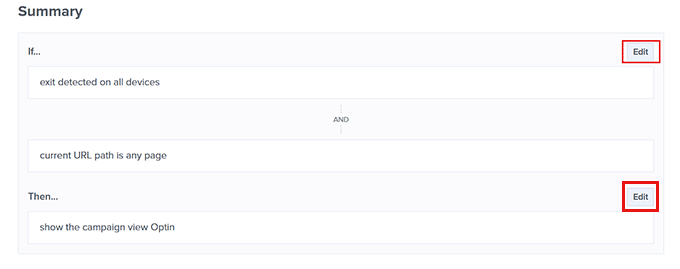
Your display rule for the banner will now be shown on the screen.
If you want to change something here, then you can click the ‘Edit’ button to fix it.
Step 4: Publish Your Banner
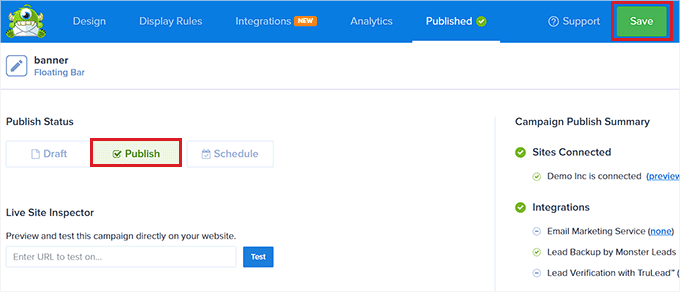
You can now switch to the ‘Publish’ tab at the top and click the ‘Save’ button in the top right corner of the screen.
After that, simply click on the ‘Publish’ button to display the banner on your website.
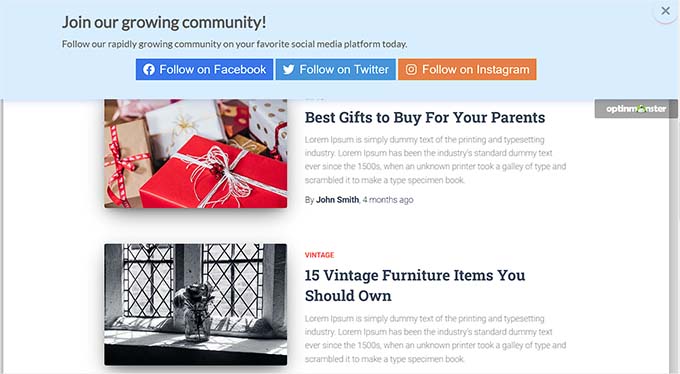
Now visit your website to see the banner at the top of your screen.
This is what it looked like on our demo site.
Method 2: Make a Website Banner Using Canva (Free)
If you want to make a website banner for free, then this method is for you.
Canva is a popular web-based tool that allows you to create all kinds of graphics, including banners, logos, posters, book covers, and more. It also offers a free version that you can use to create a website banner design.
Step 1: Create a Canva Account
First, you will need to visit the Canva website and click on the ‘Sign Up’ button to create an account.
If you already have a Canva account, then you can simply log in.
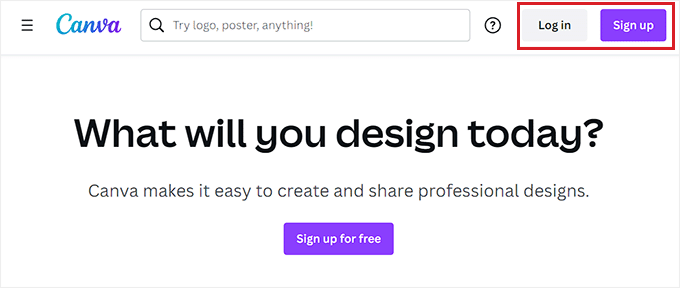
Upon account creation, you will be taken to your Canva account home page.
From here, you need to switch to the ‘Templates’ tab from the left column and then search for banner templates using the search box at the top.
This will display all the banner templates available in Canva. However, some of these templates may be locked because they are paid features.
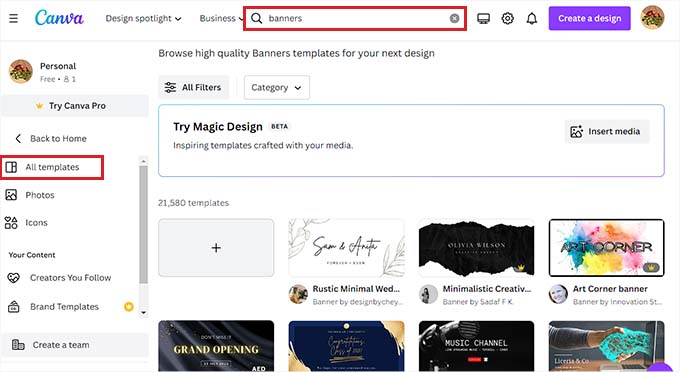
Step 2: Design Your Website Banner
Once you select a template, Canva’s design interface will be launched on the screen.
From here, you can customize your banner template according to your liking. You can change the existing content in the template by clicking on the blocks and adding your own text.
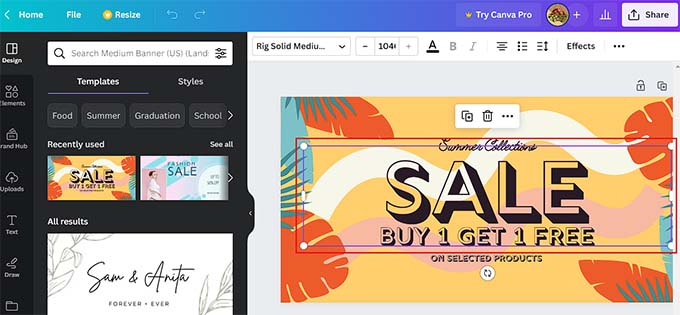
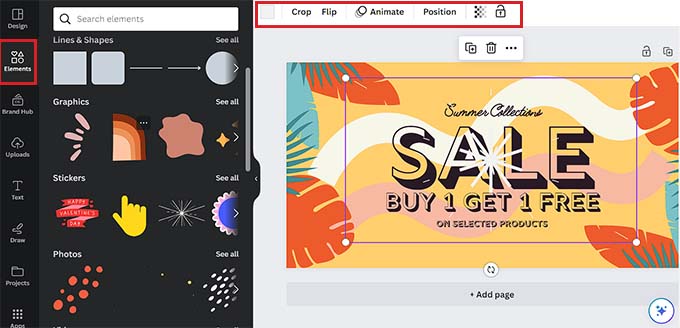
You can even add different graphical elements like stickers, photos, and videos by switching to the ‘Elements’ tab in the left column.
Upon adding an element, you can further change its animation, position, and transparency from the menu at the top.
You can also upload media files from your own computer by switching to the ‘Uploads’ tab from the left column.
To add some text to your banner, simply switch to the ‘Textbox’ tab from the column on the left.
Once there, you can use default text styles or different font combinations to add some content to your banner.
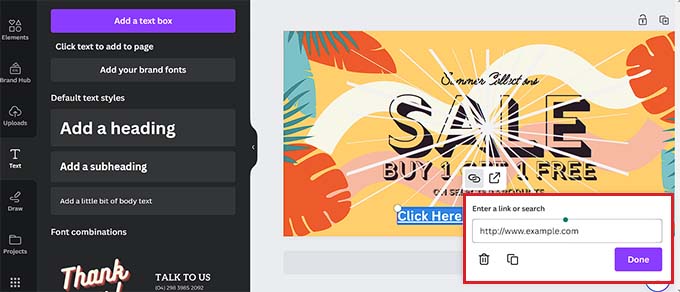
You can even add a call to action with a link by selecting the text using your mouse. This will display a link icon at the top of the text.
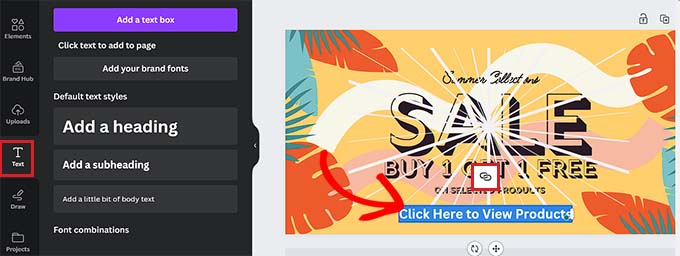
Simply click on that icon and copy and paste the link you want to add.
After that, click the ‘Done’ button to save it.
Step 3: Get an Embed Code for the Banner
Once you are happy with your banner customization, just click the ‘Share’ button in the top right corner of the screen.
This will open up a prompt menu where you must select the ‘More’ option at the bottom.
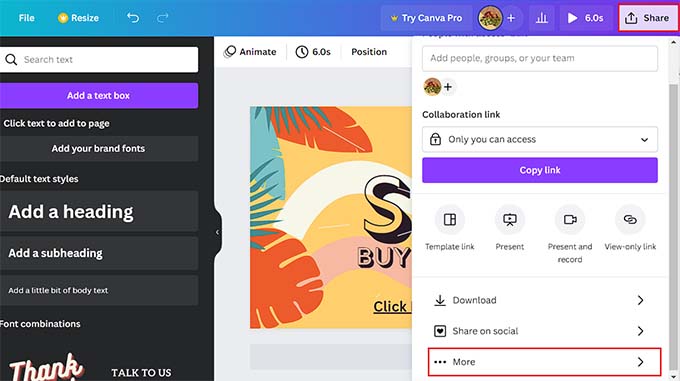
This will take you to the ‘All Options’ menu, where you have to select the ‘Embed’ option.
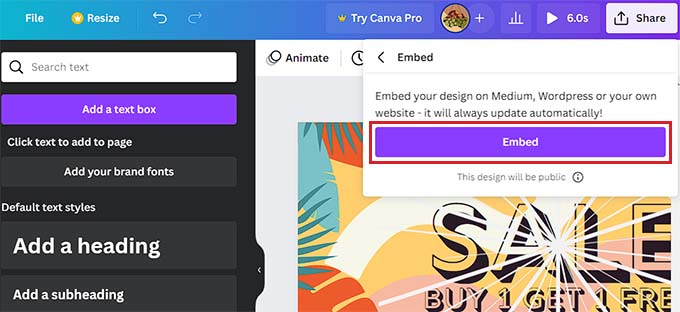
Once you do that, a new prompt will open up on the screen. From here, simply click the ‘Embed’ button.
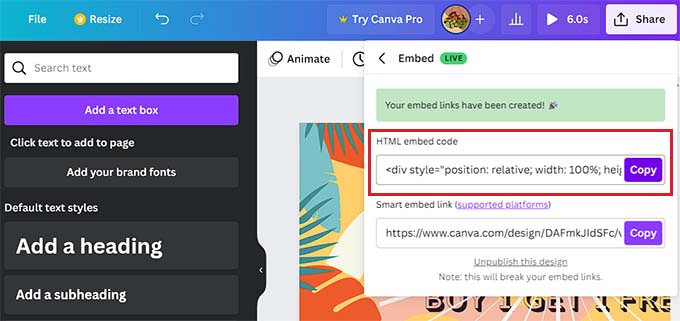
Canva will now create an HTML embed code for you.
Once it’s displayed on the screen, click the ‘Copy’ button under the ‘HTML embed code’ option.
Step 4: Add the HTML Embed Code in WordPress
You can now display your banner on your WordPress page, post, or sidebar according to your liking. For this tutorial, we will be showing our banner on a WordPress page.
First, you need to open the page or post where you want to add the banner.
Once there, click the ‘+’ button in the top left corner of the screen to find and add the Custom HTML block to the page.
Once you have done that, simply paste the embed code you copied into the block.
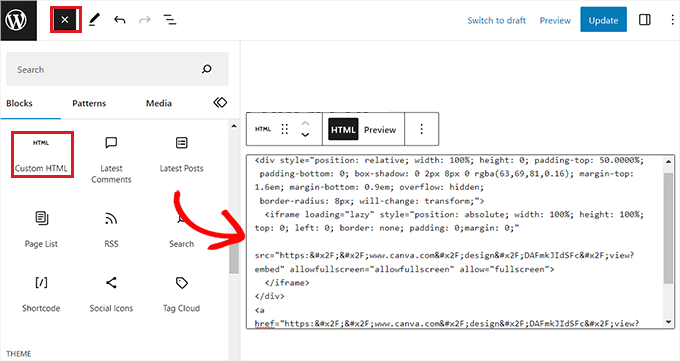
Finally, click the ‘Update’ or ‘Publish’ button to save your changes.
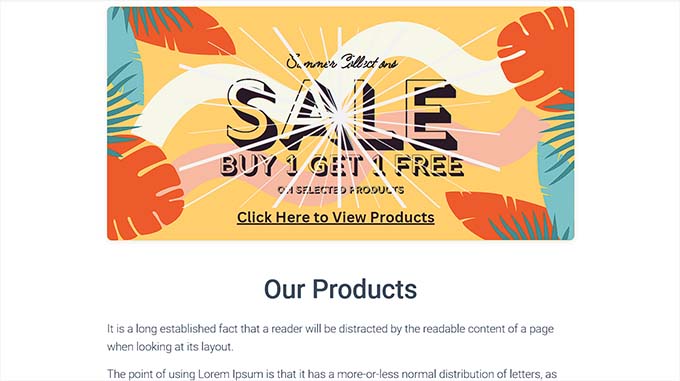
Now visit your website to see the WordPress banner in action.
Method 3: Make a Website Banner Using Thrive Leads
You can also create a website banner using Thrive Leads. It’s a popular WordPress popup plugin used by over 114,000+ websites.
With Thrive Leads, you can design banners that will help you capture leads on your WordPress site and grow your email list.
Step 1: Install Thrive Leads on Your WordPress Website
First, you will need to visit the Thrive Themes website and sign up for an account. Once you have done that, head over to your member dashboard.
From here, go ahead and click the ‘Download and install the Thrive Product Manager plugin’ link.
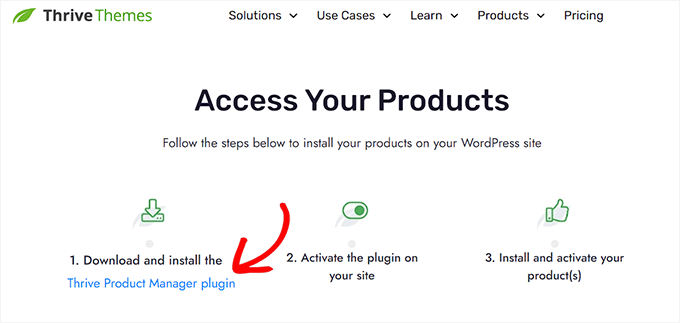
Next, you need to visit your WordPress website to install and activate the Thrive Product Manager plugin. For detailed instructions, you may want to see our step-by-step guide on how to install a WordPress plugin.
Upon activation, head over to the Product Manager tab from the WordPress admin dashboard and click the ‘Log into my account’ button.
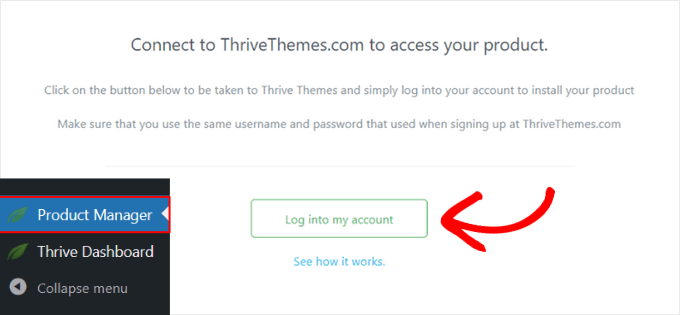
After entering your login credentials, you will be able to see your Thrive Product Manager dashboard.
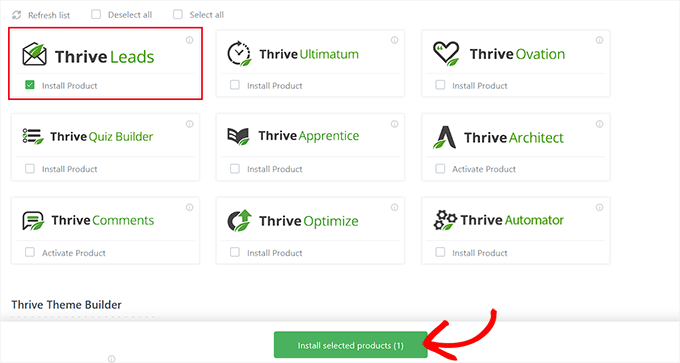
From here, you can select the products that you want to install and use on your site. Simply choose the ‘Thrive Leads’ plugin and click the ‘Install selected products’ button.
Step 2: Create a Website Banner
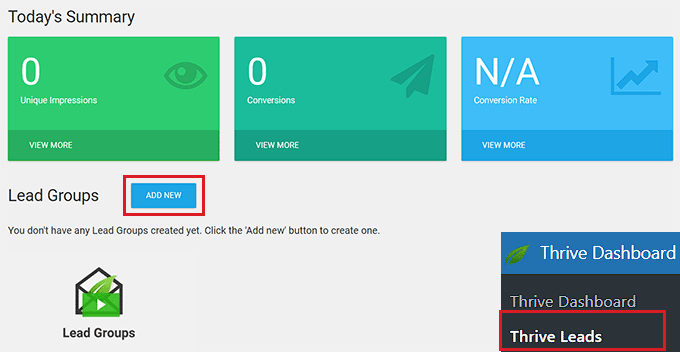
After the plugin installation, you need to visit the Thrive dashboard » Thrive Leads page from the WordPress admin sidebar.
Once you are there, just click the ‘Add New’ button next to the ‘Lead Groups’ option.
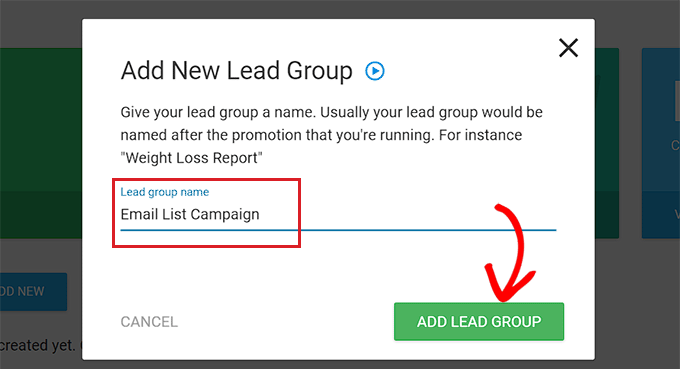
This will display the ‘Add New Lead Group’ popup on your screen, where you need to type a name for the lead group you are creating.
Make sure to name the lead group in a way that will help you identify it.
For instance, if you are creating a banner to build your email list, then you can name your lead group ‘Email List Campaign’.
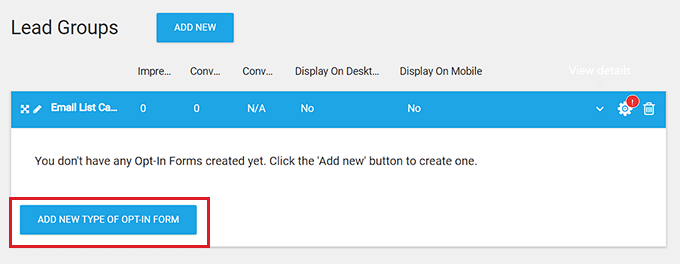
After that, the lead group you created will be added to the screen. From here, you have to click the ‘Add New Type Of Opt-In Form’ button.
This will open a new prompt where you must choose the type of banner you would like to create.
You can create a slide-in, ribbon, widget, in-content, lightbox, or scroll mat banner according to your liking.
These banners will be like a form as they will collect data from your users, including email addresses, phone numbers, and more.
For this tutorial, we will be creating a ribbon banner for our site.
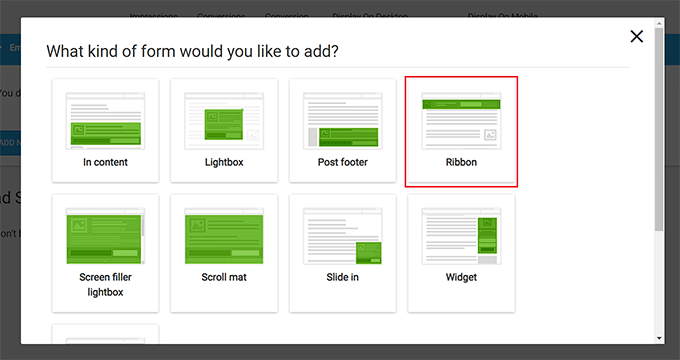
Upon choosing a website banner design type, the prompt will automatically disappear from the screen.
Now, to open your lead group dashboard, you must click the ‘Add’ button in the right corner of your Lead Groups tab.
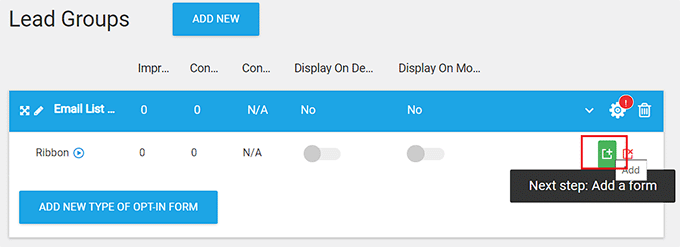
This will take you to your Lead Groups dashboard, where all the forms and lead reports for the group will be displayed after your campaign goes live.
For example, if you want to create a banner to capture email addresses, then all the user information you collect through the banner will be displayed here.
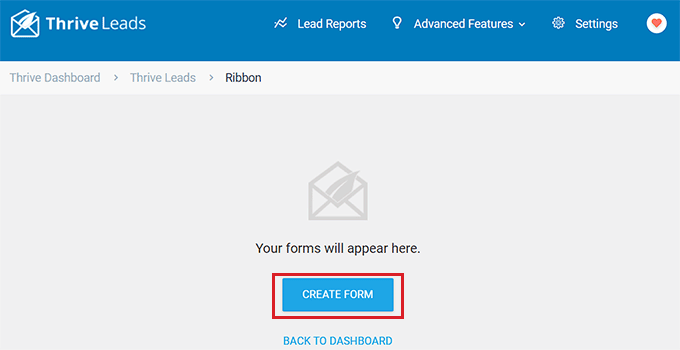
For now, you just have to click the ‘Create Form’ button to start building your banner.
This will open up a new prompt where you must provide a name for the form and click the ‘Create Form’ button.
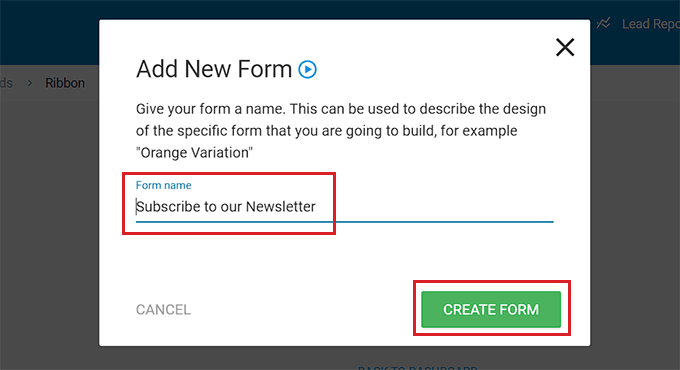
Once your form has been created, it will be displayed in your Lead Groups dashboard.
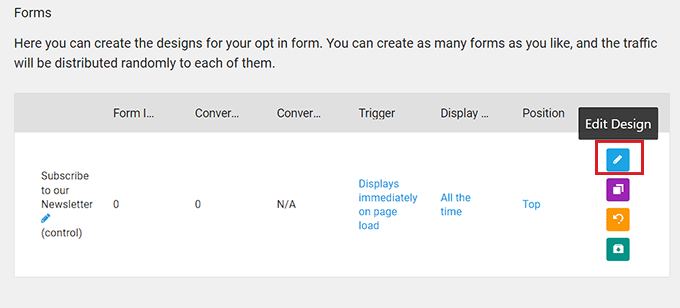
From here, you have to click the ‘Edit Design’ button in the right corner to start building your banner.
Step 3: Customize Your Website Banner
The Thrive visual editor will now be launched in a new tab on your screen.
From here, you can start by selecting a template for your banner from the ‘Thrive Leads Library’ prompt.
You can then use one of the pre-made template as it is or further customize it with the visual editor. Upon making your choice, simply click the ‘Choose Template’ button to move forward.
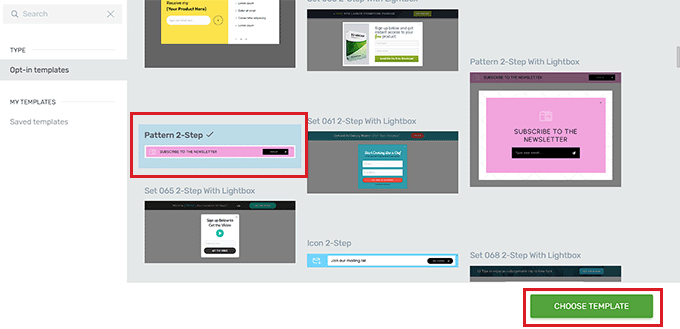
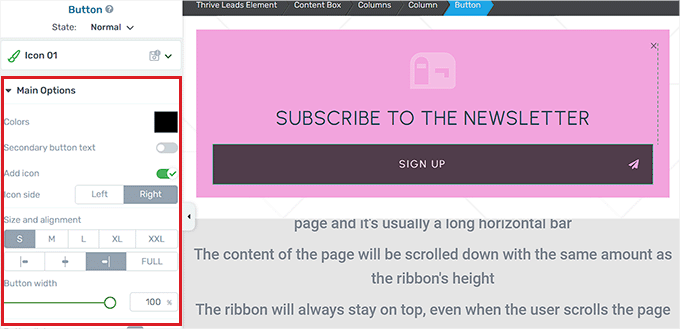
After adding a template for a ribbon banner, you can easily customize the elements in it by clicking on each one. This will open up the element’s settings in the sidebar on the left.
For example, if you want to change the button color in your template, then you simply need to click on it to open its settings in the sidebar.
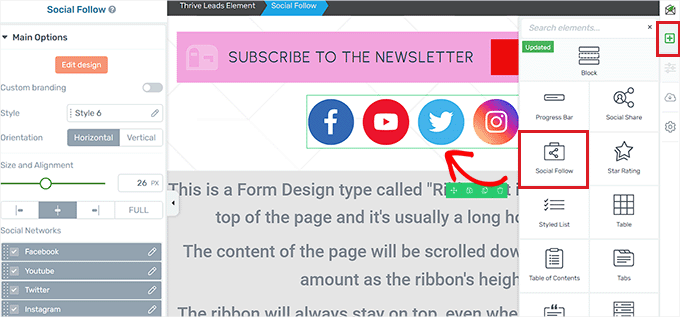
If you want to add a completely new element to your banner, then you can also do that by clicking the ‘+’ icon in the right corner of the screen.
This will open the ‘Add Elements’ sidebar on the right, where you can drag and drop elements of your choice onto the banner.
For instance, if you want to add social media account buttons to your banner, then you will have to drag and drop the Social Follow element from the right sidebar.
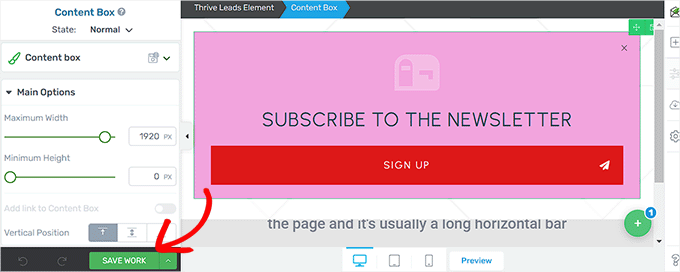
Once you are happy with your banner, click the ‘Save Work’ button in the bottom left corner to store your changes.
After that, you need to return to your Lead Groups dashboard.
Step 4: Configure Banner Settings
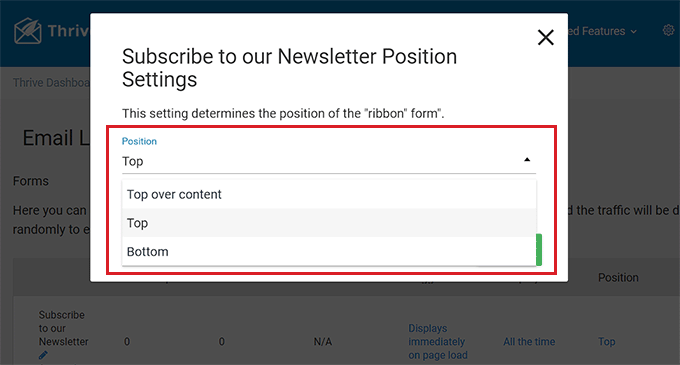
Once you are back in your dashboard, you can change the position of your banner by clicking on the ‘Position’ option in the form row.
This will open the ‘Position Settings’ prompt, where you can choose your preferred banner position from the dropdown menu.
After that, click the ‘Save’ button.
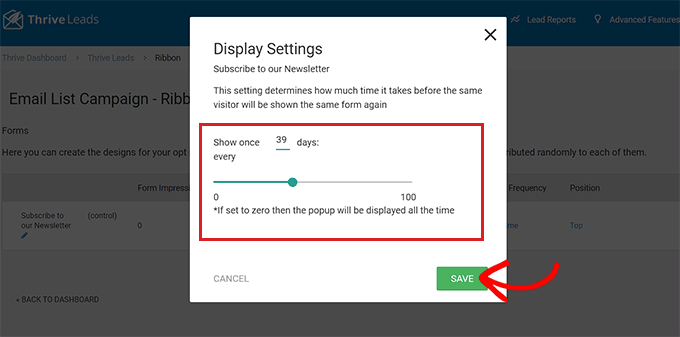
Next, to configure the display frequency of the banner, click the ‘Display Frequency’ option in the form row.
This will open the ‘Display Settings’ prompt, where you can use the slider to determine the number of times the banner should be displayed on the screen.
If you keep the number 0, then the banner will be displayed at all times. Upon making your choice, click the ‘Save’ button to store your settings.
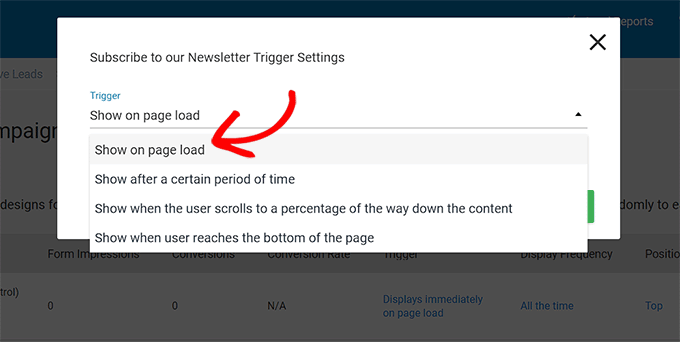
If you want to add a specific trigger for your banner display, then you need to click the ‘Trigger’ option in the form row.
This will display the ‘Trigger Settings’ prompt, where you can choose a trigger for your banner from the dropdown menu, such as after a certain period of time or when a user reaches the bottom of the page.
Once you are done, click the ‘Save’ button to save your settings.
Step 5: Publish Your Banner
After you have configured the banner settings, you need to exit your Lead Groups dashboard and head back to the Thrive Leads dashboard by clicking on the link at the top.
Once you are there, expand your Lead Groups tab and toggle the ‘Display On Desktop’ switch to ‘On’. If you also want to display your banner on mobile devices, then you can toggle the ‘Display On Mobile’ switch to ‘On’.
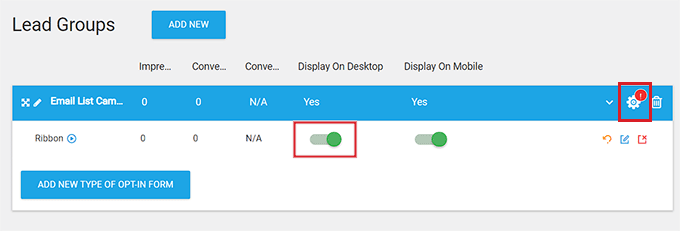
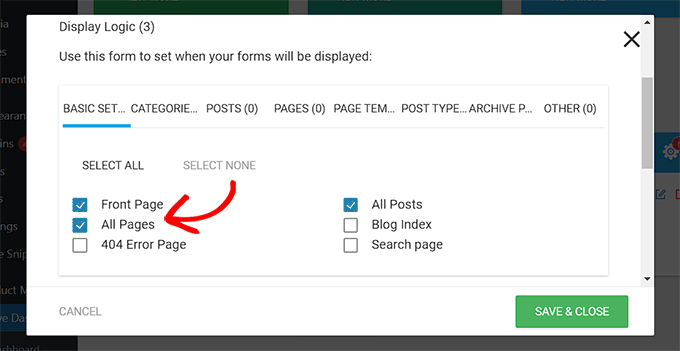
After that, click the gear icon in the top right corner of the Lead Groups tab to open up the display settings.
Here, you can select the website pages that you want the banner to be displayed on. For instance, if you want the banner to show at the top of all the pages and posts, then you can check the box next to these options.
Finally, click the ‘Save and Close’ button to save your changes.
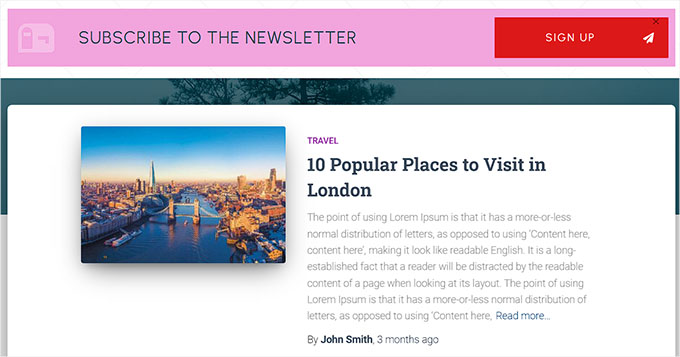
Now, you can visit your website to check out the banner displayed at the top of the page.
This is what it looked like on our demo website.
We hope this article helped you learn how to easily make a website banner for WordPress. You may also want to see our beginner’s guide on how to customize colors on your WordPress website and our top picks for the best web design software.
If you liked this article, then please subscribe to our YouTube Channel for WordPress video tutorials. You can also find us on Twitter and Facebook.

