Are you looking to add a member directory to your WordPress website?
Adding a directory to your membership site can help boost your community engagement. It encourages new members to join and make it easy for them to reach out to each other.
In this article, we will show you how to create a searchable member directory in WordPress.
Why Create a Searchable Member Directory in WordPress?
A membership site often brings together users who share common interests. You can create a sense of community on your WordPress website by making it easy for your members to communicate with one another about their shared interests.
You can do this by creating a membership directory. This is a searchable list of the members on your site. It allows your members to see other members’ profiles and contact details.

This will boost your website’s credibility and make it more valuable to your members. It may even help your members feel important and recognized.
However, to protect their privacy, you may want to require each member to opt in before their personal information is displayed in the directory.
If you haven’t yet created your membership site, then you can follow our ultimate guide on creating a WordPress membership site.
While you can use any method to create a membership site, we recommend the MemberPress plugin. It offers advanced membership features and integrates well with the Formidable Forms Directory addon used in this tutorial.
How to Create a Searchable Member Directory in WordPress
The best way to create a member directory is by using the Formidable Forms plugin. It comes with advanced features that let you format, filter, and display user-submitted data on the front end of your website, including your members’ profile information.
It is one of the best user registration plugins for WordPress on the market and can help you easily create a member directory using an addon. Plus, it integrates with MemberPress to give you complete control over your directory’s appearance and functionality.
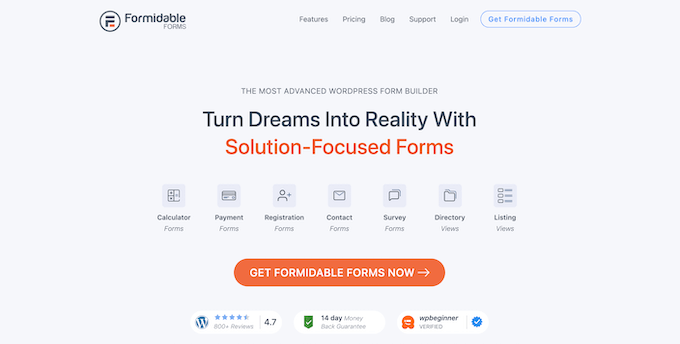
You can use Formidable Forms to create a profile form where members can enter their information and opt in to the directory. You can also use it to display the searchable member directory itself.
Besides that, you will also be able to use Formidable Forms for all sorts of other purposes on your website, such as creating a booking form or web directory, allowing your clients to request a quote, and more.
With that in mind, let’s see how to create a searchable member directory using the Formidable Forms plugin.
1. Installing Formidable Forms on Your Membership Site
The first thing you need to do is install and activate Formidable Forms Lite, which is the free version of the plugin. Formidable Forms Lite acts as the base for the advanced features of the Pro version.
For more details, you can read our guide on how to install a WordPress plugin.
Next, you will need to visit the Formidable Directory page and click the ‘Get Formidable Directory’ button. You will then be prompted to purchase the Elite plan, which includes the Directory addon.

Before leaving the Formidable website, you will need to copy your license key. You can find it by clicking ‘Account’ at the top of the page.
Now return to your website and navigate to Formidable » Global Settings. Once there, simply click the link that says ‘Click to enter a license key manually’ to paste your license key and then click the ‘Save License’ button.

You are now ready to create a member directory in WordPress.
2. Creating the Formidable Member Directory Application
Next, you must navigate to Formidable » Applications from the WordPress admin sidebar. This page will show you the available application templates.
Once there, you need to find the Member Directory application and click the ‘+ Add’ button to install it.
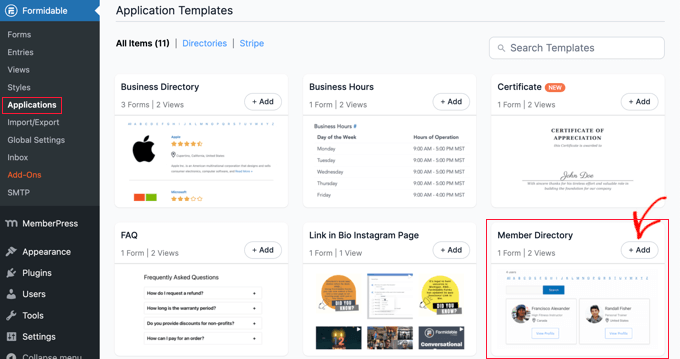
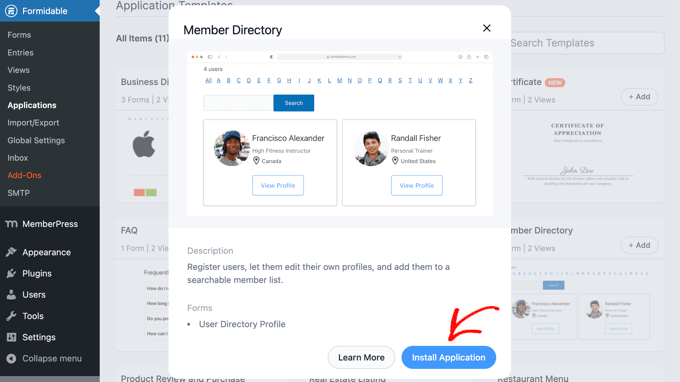
This will open a popup that describes the Member Directory application.
Simply click the ‘Install Application’ button to continue.
Next, you will be asked to give the application a name.
For this tutorial, we will leave the default name, ‘Member Directory’, and then click the ‘Install Application’ button to continue.

Formidable Forms will now create the pages, forms, and views needed for your member directory. The pages are saved as drafts, so you can customize them before they go live.
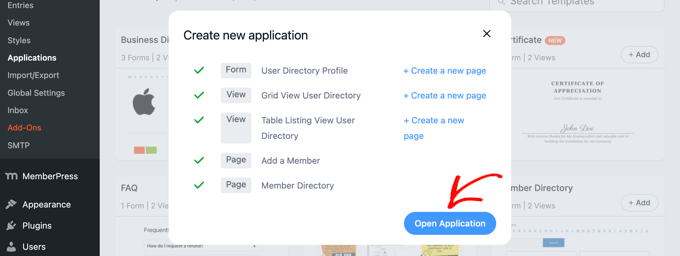
Now you need to click the ‘Open Application’ button. This will open the Member Directory application page, where you can customize and publish your directory.
You have now created a ‘User Directory Profile’ form that your members can fill out on the ‘Add a Member’ page.
There is also a ‘Member Directory’ page where you can view the directory in a table view or grid view.
3. Customizing the Member Profile Form and ‘Add a Member’ Page
Next, you may wish to add or remove some fields from the ‘User Directory Profile’ form. This is the form that your members must fill in to be included in the directory.
You may also want to add some instructions to the page where the profile form is displayed before you publish it.
Customizing the ‘User Directory Profile’ Form
The ‘User Directory Profile’ form contains all of the fields needed for most member profiles. You can customize it by clicking the ‘User Directory Profile’ link or hovering your mouse over it and then clicking on ‘Edit’.
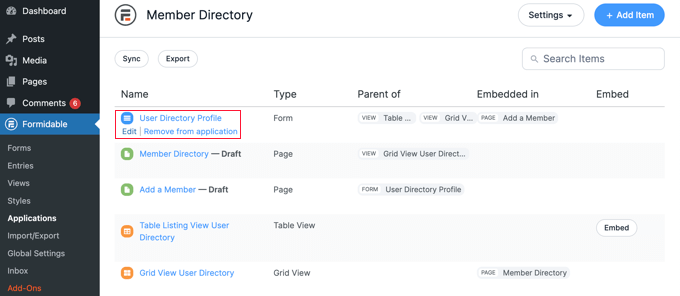
This will open the form editor. You will see a preview of the form on the right and the available fields on the left.
The form includes contact details, social links, and more. Some of the fields will be filled in automatically using information from the member’s WordPress user profile. This includes their name, email address, and bio.
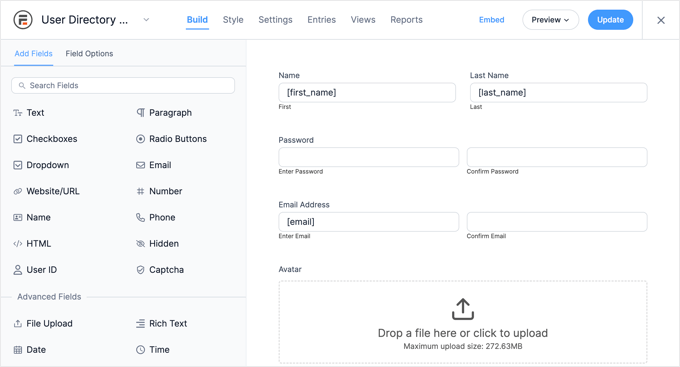
To add new fields, simply drag them onto the form from the ‘Add Fields’ column on the left.
You can change the options of a field by clicking on it. This will open the ‘Field Options’ tab on the left, where you can customize the field by changing its settings.
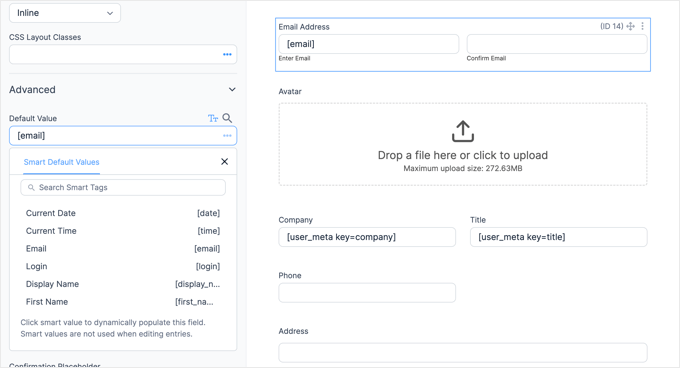
You will find options for the field’s default value in the ‘Advanced’ section. Here you can choose the default value from a list of smart tags. This will take information that the user has already added to their WordPress profile so that it doesn’t have to be entered twice.
When you scroll to the bottom of the form, you will notice it already includes fields for social links and an option where the member can choose to be included in the directory.
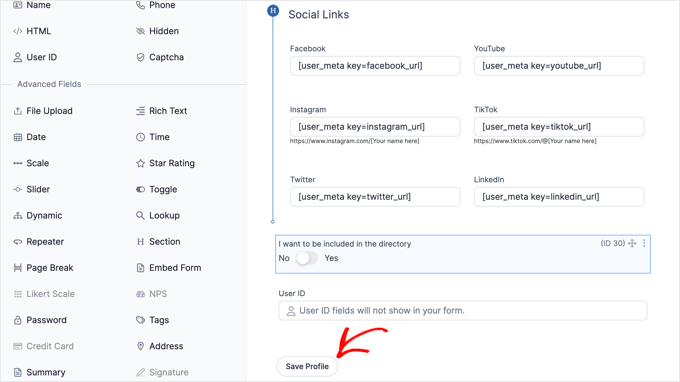
Once you have finished customizing the form, simply click the ‘Save Profile’ button to store your changes.
Customizing the ‘Add a Member’ Page
Next, you will need to customize and publish the ‘Add a Member’ page that will display the profile form on your website.
You may need to navigate back to Formidable » Applications » Member Directory to see the page. Then, simply click the ‘Add a Member’ link, or hover over it and click ‘Edit.’
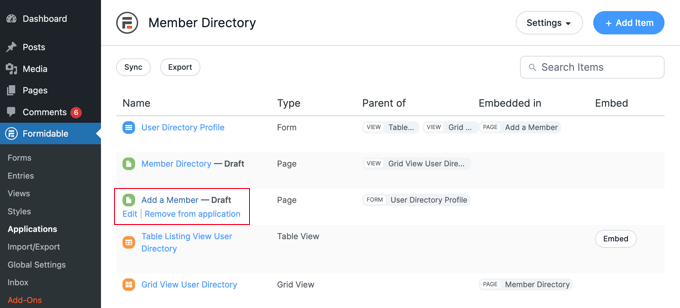
This will open the ‘Add a Member’ page in the WordPress content editor. It simply contains the page title and the Formidable form that you were just looking at.
If you like, you can give the page a different title, such as ‘Join Our Member Directory’.
If you would like to add some instructions before the form, then you should click on the page title and press the Enter key. This will create a new block where you can type those instructions.
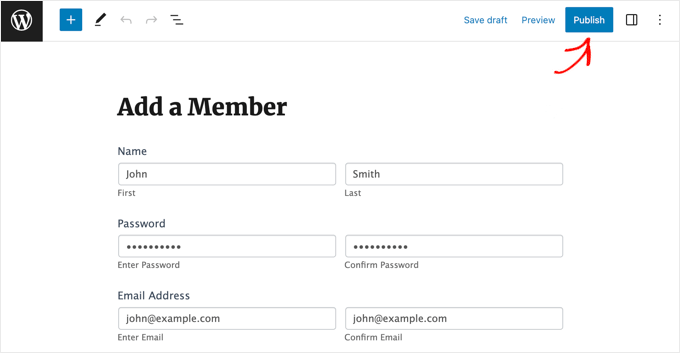
When you are happy with the page, then simply click the ‘Publish’ button at the top of the screen to push the page live on your website.
4. Customizing the ‘Member Directory’ Page
Now you can customize and publish the member directory itself. You will need to choose whether to display the members in a grid or table. Then, you must also publish the page so that it is visible on your website.
Customizing the ‘Member Directory’ Page
First, just go back to Formidable » Applications and click on your member directory application.
You will need to publish the draft ‘Member Directory’ page. However, before doing that, you can decide whether that page should display the directory in a grid or table format.
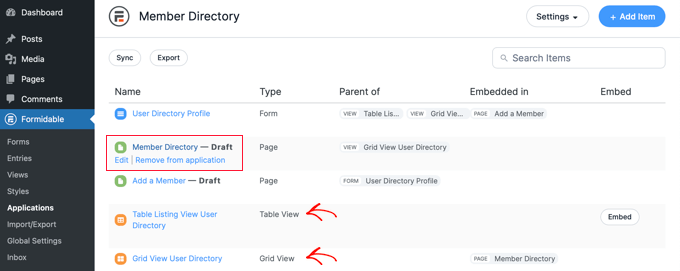
Simply click on the ‘Member Directory’ page to open it in the WordPress editor.
The page contains just the title and the following shortcode that displays the directory:

By default, the shortcode will display the directory in a two-column grid.
You can preview the page to see how it will look.
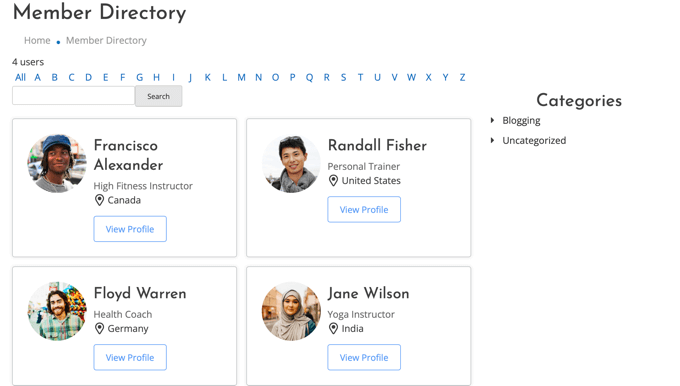
Alternatively, you can display your member directory in a table format.
To do that, you will need to use this shortcode instead:

You can preview the page again to see the changes.
This time each member will be displayed on a single line with their information in columns.
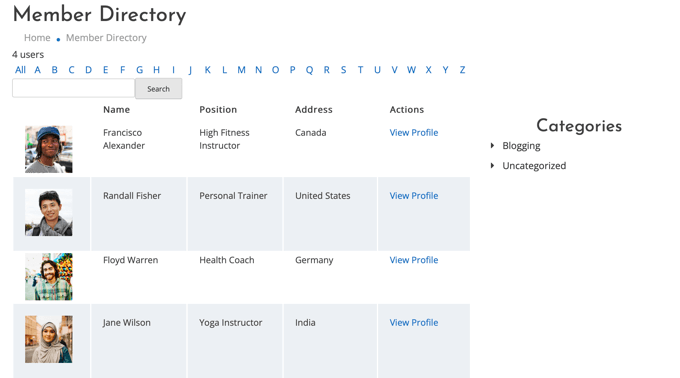
Whichever shortcode you choose, clicking on ‘View Profile’ will show you more detailed information about that member.
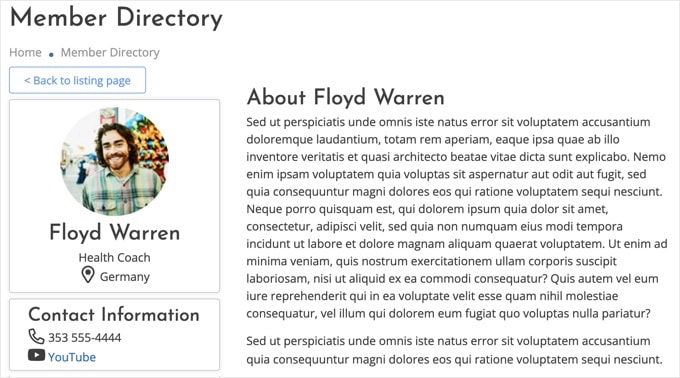
If you like, you can add additional content to the page. Just make sure to click the ‘Publish’ button to push your member directory live on your website when you are finished.
Adding the Member Directory Pages to Your Navigation Menu
You can make it easier for your members to find or join the directory by adding the ‘Add a Member’ and ‘Member Directory’ pages to your website’s navigation menu.
Simply follow our guide on how to add specific posts to the WordPress navigation menu.
Restricting the Member Directory to Members Only
Also, depending on the type of membership site you have, you may want only your logged-in members to be able to see the ‘Add a Member’ and ‘Member Directory’ pages.
If so, then you will need to create a rule so that only members get access to the pages.
We show you how to do that step by step in our ultimate guide on creating a WordPress membership site. You will just need to scroll down and read Step 6 to learn how to create a MemberPress rule and Step 7 to learn how to add members-only content.
5. Deleting the Sample Data in Your Member Directory
Your member directory contains the sample data that you can see in the screenshots used in this tutorial. This is helpful when setting up your member directory because it lets you see how the profiles will look.
But once you have finished setting up the directory, you will need to delete the sample data.
You need to navigate back to Formidable » Applications » Member Directory and click on the ‘User Directory Profile’ form.
Once the Formidable editor opens, click on the ‘Entries’ tab at the top of the screen to view the sample entries.
Most likely, the only entries listed will be the four sample members. In that case, simply click the ‘Delete All Entries’ button at the top of the screen. All members listed will be deleted.
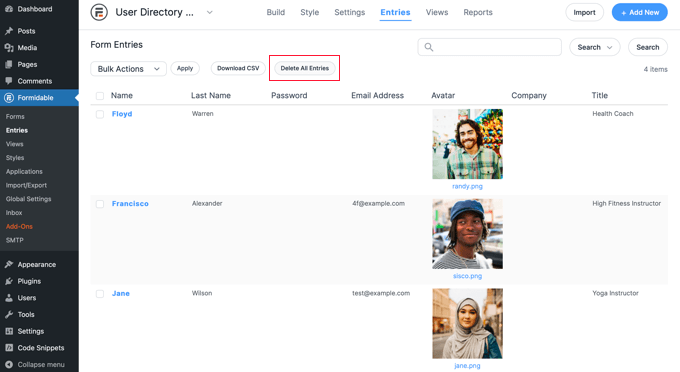
However, if some of your real members have already created profiles, you must select the sample entries manually.
To do this, you will need to click the checkbox next to each sample member. Next, click the ‘Bulk Actions’ button at the top of the list and select ‘Delete’ from the drop-down menu.
Finally, click the ‘Apply’ button to delete the sample data. Your member directory will now only contain profiles from your real members.
We hope this tutorial helped you learn how to create a searchable member directory in WordPress. You may also want to see our guide on how to create and sell online courses with WordPress or our expert picks for the best contact forms for WordPress.
If you liked this article, then please subscribe to our YouTube Channel for WordPress video tutorials. You can also find us on Twitter and Facebook.
The post How to Create a Searchable Member Directory in WordPress first appeared on WPBeginner.

