Do you want to learn how to password-protect your WordPress admin directory?
Adding another layer of password protection to your WordPress admin directory can be a great way to improve your WordPress security.
In this article, you’ll learn how you can password-protect your wp-admin directory easily.
Why Password Protect Your WordPress Admin Directory?
By password-protecting your WordPress admin directory, you improve the security of the most important entry point to your WordPress website.
Your WordPress admin dashboard is the central hub of your site. It’s where you’ll publish posts and pages, customize your theme, install WordPress plugins, and more.
Often, when hackers try to get into your website, they’ll do it through the wp-admin screen. You can help to protect your website against potential attacks by using a secure password and limiting login attempts.
To be even more secure, you can also password-protect the wp-admin directory. Then when someone attempts to access your admin area, they’ll need to enter a username and password before they ever make it to the WordPress login screen.
With that said, let’s take a look at how you can password-protect your WordPress admin directory step by step.
The first method is recommended for most users, and you can use the quick links below to jump straight to the method you want to use.
Method 1: Password-Protect wp-admin Using Directory Privacy (Recommended)
The easiest way to password-protect your WordPress admin directory is by using your WordPress hosting provider’s Directory Privacy app.
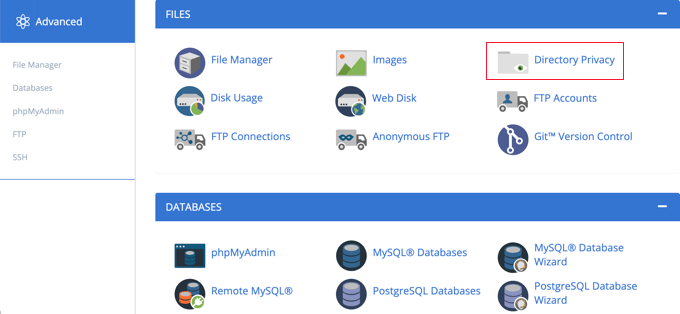
First, you need to log in to your hosting account dashboard and click on the ‘Directory Privacy’ option in the Files section of your website’s advanced settings.
Note: Most web hosts using cPanel, like Bluehost, will have similar steps. However, your dashboard might be slightly different from our screenshots depending on your hosting provider.
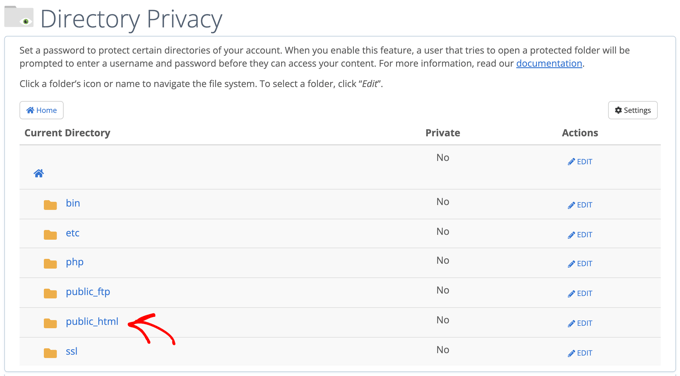
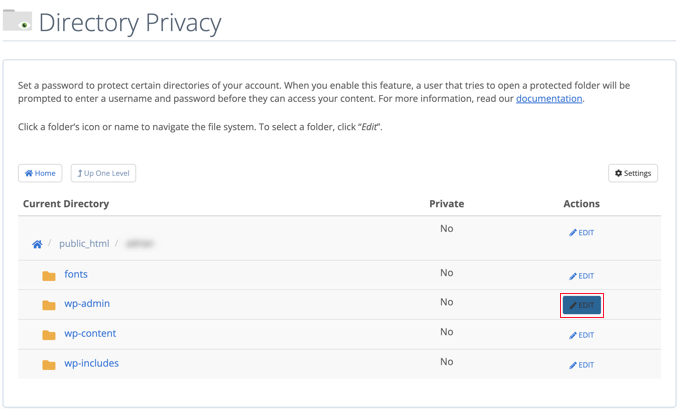
This brings you to a screen that lists all of the different directories on your server. You need to find the folder that contains your website files.
For most website owners, this can be found by clicking on the ‘public_html’ folder.
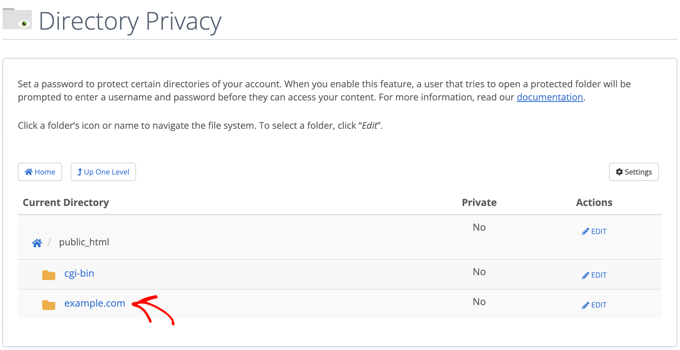
This brings up all of the website files you’ve installed on your server.
Next, you’ll need to click on the folder with your website’s domain name.
In that folder, you’ll see a ‘wp-admin’ folder.
Instead of clicking the folder name, you’ll need to click the ‘Edit’ button next to that folder.
This brings you to a screen where you can turn on password protection.
Simply check the box that says ‘Password protect this directory’. If you like, you can also give your directory a name like ‘Admin Area’ to help you remember.
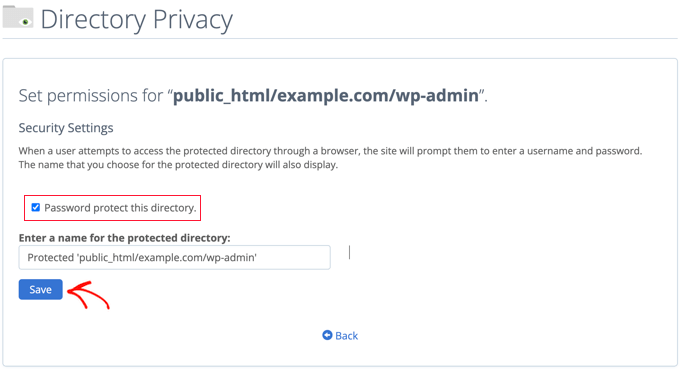
Once you’ve done that, you’ll need to click the ‘Save’ button.
This will take you to a page where the confirmation message will appear.
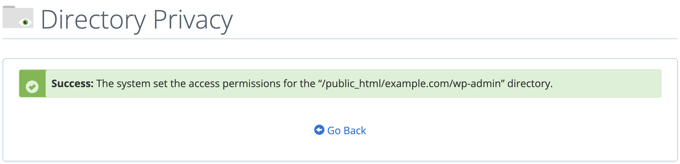
Now you’ll need to click the ‘Go Back’ button and you’ll be taken to a screen where you can create a user that will be able to access this directory.
You will be asked to enter a username and password, and then confirm the password. Make sure to note your username and password in a safe place, such as a password manager app.
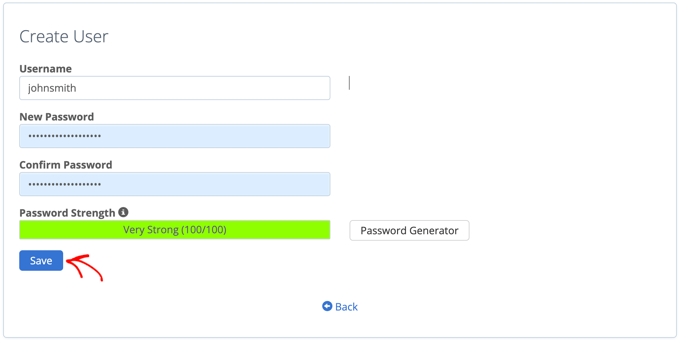
Make sure you click the ‘Save’ button when you’ve done that.
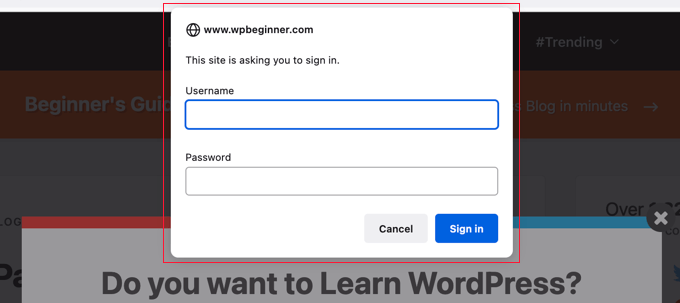
Now, when someone tries to access your wp-admin directory, they will be prompted to enter the username and password you created above.
Method 2: Password-Protect wp-admin Using Code
You can also password-protect your WordPress admin directory manually. To do this you’ll need to create two files called .htpasswd and .htaccess.
Note: Adding any code to your website can be dangerous. Even a small mistake can cause major errors on your site. We only recommend this method for advanced users.
Creating the .htaccess File
First, open up your preferred text editor and name the new file .htaccess.
After that, you need to copy the following code snippet and add it to the file.
AuthUserFile /home/user/public_html/example.com/wp-admin/.htpasswd
AuthGroupFile /dev/null
AuthType basic
require user yourusername
Make sure you change the ‘AuthUserFile’ path to the location where you’ll upload the .htpasswd file and change ‘yourusername’ to the username you want to use to log in.
Don’t forget to save the file when you’re finished.
Creating the .htpasswd File
Once you’ve done that, you need to create a .htpasswd file.
To do this, open up a text editor and create a file called .htpasswd. This file will list your username along with your password in an encrypted format.
The easiest way to generate the encrypted password is with a htpasswd generator.
Simply enter your username and password, select the encryption format, and click the ‘Create .htpasswd file’ button.
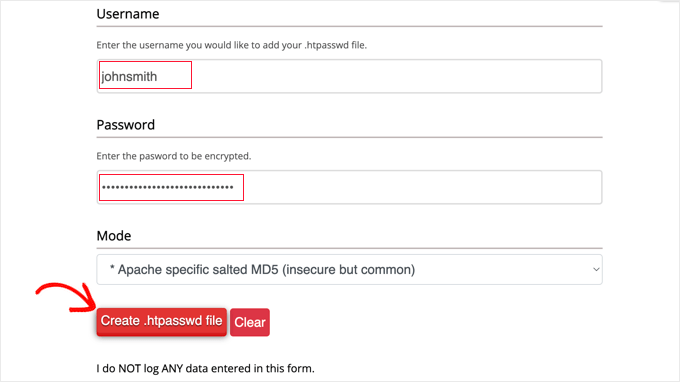
The htpasswd generator will display a line of text that you need to paste into your .htpasswd file. Make sure you save the file once you’ve done that.
Uploading .htaccess and .htpasswd to the wp-admin Directory
The last step is to upload both of the files you created to your website’s wp-admin folder.
You will need to connect to your WordPress hosting account using an FTP client or the online file manager tool provided by your hosting provider. For more details, see our beginner’s guide on how to use FTP to upload files to WordPress.
For this tutorial, we’ll use FileZilla because it’s free and works on both Mac and Windows.
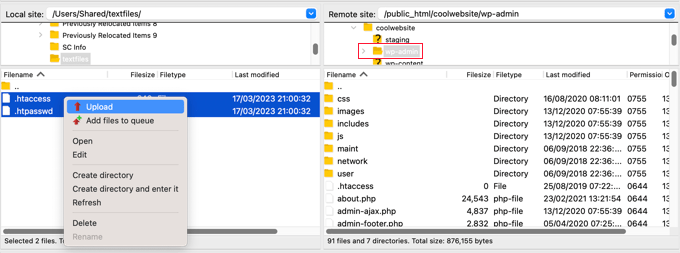
Once you have connected to your website, you will see the files on your computer in the left window, and the files on your website in the right. On the left, you need to navigate to the location where you saved the .htaccess and .htpasswd files.
Then on the right, you need to go to the wp-admin directory for the website you wish to protect. Most users will need to double-click the ‘public_html’ folder, then the folder with their domain name, then the ‘wp-admin’ folder.
Now you can select the two files on the left and click ‘Upload’ from the right-click menu or simply drag the files onto the left window.
Now your ‘wp-admin’ directory will be password protected.
Troubleshooting wp-admin Password Protection
Depending on how your server and website are set up, there’s a chance you might run into errors. These errors can be fixed by carefully adding code to your .htaccess file.
Note: This is the .htaccess file located in your main website folder, not the one you uploaded to the ‘wp-admin’ folder. If you’re having trouble finding it, then see our guide on why you can’t find .htaccess and how to locate it.
Fixing the Ajax Not Working Error
One of the most common errors is that Ajax functionality may stop working on the front end of your site. If you have WordPress plugins that require Ajax, such as live Ajax search or Ajax contact forms, then you will notice that these plugins won’t work anymore.
To fix this, simply add the following code to the .htaccess file that’s located in your ‘wp-admin’ folder.
Order allow,deny
Allow from all
Satisfy any
</Files>
Fixing the 404 Error and Too Many Redirects Error
Two other errors you might run into are the 404 error and the too many redirects error.
The simplest way to fix them is to open up your main .htaccess file located in your website directory and add the following line of code before the WordPress rules.
We hope this article helped you learn how to password-protect your WordPress admin (wp-admin) directory. You may also want to see our expert picks of the best email marketing services for small businesses and our guide on how to get a free email domain.
If you liked this article, then please subscribe to our YouTube Channel for WordPress video tutorials. You can also find us on Twitter and Facebook.
The post How to Password Protect Your WordPress Admin (wp-admin) Directory first appeared on WPBeginner.